AMAZING Sparkle Rainbow Unicorn Poop Cookies

by Saturday, April 22, 2023

A friend in my ASL Club requested I make "rainbow cookies" for our next meetup. No idea what their motivation was, but I took it as a prompt to try something new. When I asked baking friends for suggestions, a common suggestion was "just look up Unicorn Poop Cookies", so I did.  WOAH! Those are cool! Colorful sworls of cookie dough, sometimes accompanied by a chocolate kiss on top? Perfect. However...

Many of the recipes called for sugar cookie recipes I thought sounded pretty bland. I am already not a huge fan of sugar cookies in general, but have been working on my own personal recipe this past year to hone in on the flavor. For my version, not only would I want to tweak the flavor dials, but the texture would need to be different. My goal up until now was the perfectly flat, no spread, firm sugar cookie for decorating. This was going to need different body to get the effect I wanted, but without compromising on flavor and texture. Enter some baking powder, which I omit from my favorite holiday sugar cookie recipe to avoid spread and doming, but here will provide some rounded loft we need for poop shapes. I took out the almond extract and replaced it with more (now double) the vanilla extract. I also added some lemon zest to this recipe, to add a touch of brightness I felt was needed for a cookie like this. Oh, and it of course could not be pastel for my cookies. I needed RAINBOW, as pastels will not do for the ol' ROYGBIV.

Enter Ann Clark gel colors. I had them in a wishlist from Christmas cookie baking, having never pulled the trigger. So I popped it into my Amazon cart and it was at my house the next day. WHERE HAVE YOU BEEN ALL MY LIFE?! Rich, vibrant colors with NO taste or texture effects. Just a couple dollops and WHAMMO. Bright, saturated colors for my enjoyment!!

12 colors, each of them as gorgeous as the next!

Mmmm, Ocean Teal comes in like a roaring peacock!

Super red is ACCURATE.


You'll be making your dough, dividing it into balls of however many colors you want to use, and then play with them like play-dough! I weighed my dough, divided by six, weighed out the balls to make sure they were even, and put them in their own bowls.

I put two droplets of gel into an indentation in the ball, and then used a small spatula to get the mixing started. I basically want to use a non-absorbant tool to get the color mixed in enough that I am not losing a bunch of the gel dyes onto my hands. Basically, you want as little of the gel looking wet on the surface of the dough ball, and some streaks of color should be formed in the dough before you pick it up.

Picked up the blob of dough, folding the outer edges to the middle and pressing, over and over. Fold and press, fold and press until the color is uniform. If you need more gel to get the depth of color you want, add it now. I didn't need more. MAGIC, I tell you. Ann Clark, you rock.

I rolled each dough ball into fat little burritos, wrapped each in parchment paper (can do saran, or whatever), and chilled for 30 minutes.

I took each burrito and cut it into thirds, placing two of the thirds back in the fridge to stay firm while I worked with one third at a time. The dough will soften with the warmth of your hands and become pliable. If it ever feels like it is getting too warm and floppy, you can put it back in the fridge to chill a little bit before working again. It won't do your cookies any harm. Just helps to have it firm enough to work with comfortably.

Further steps below:

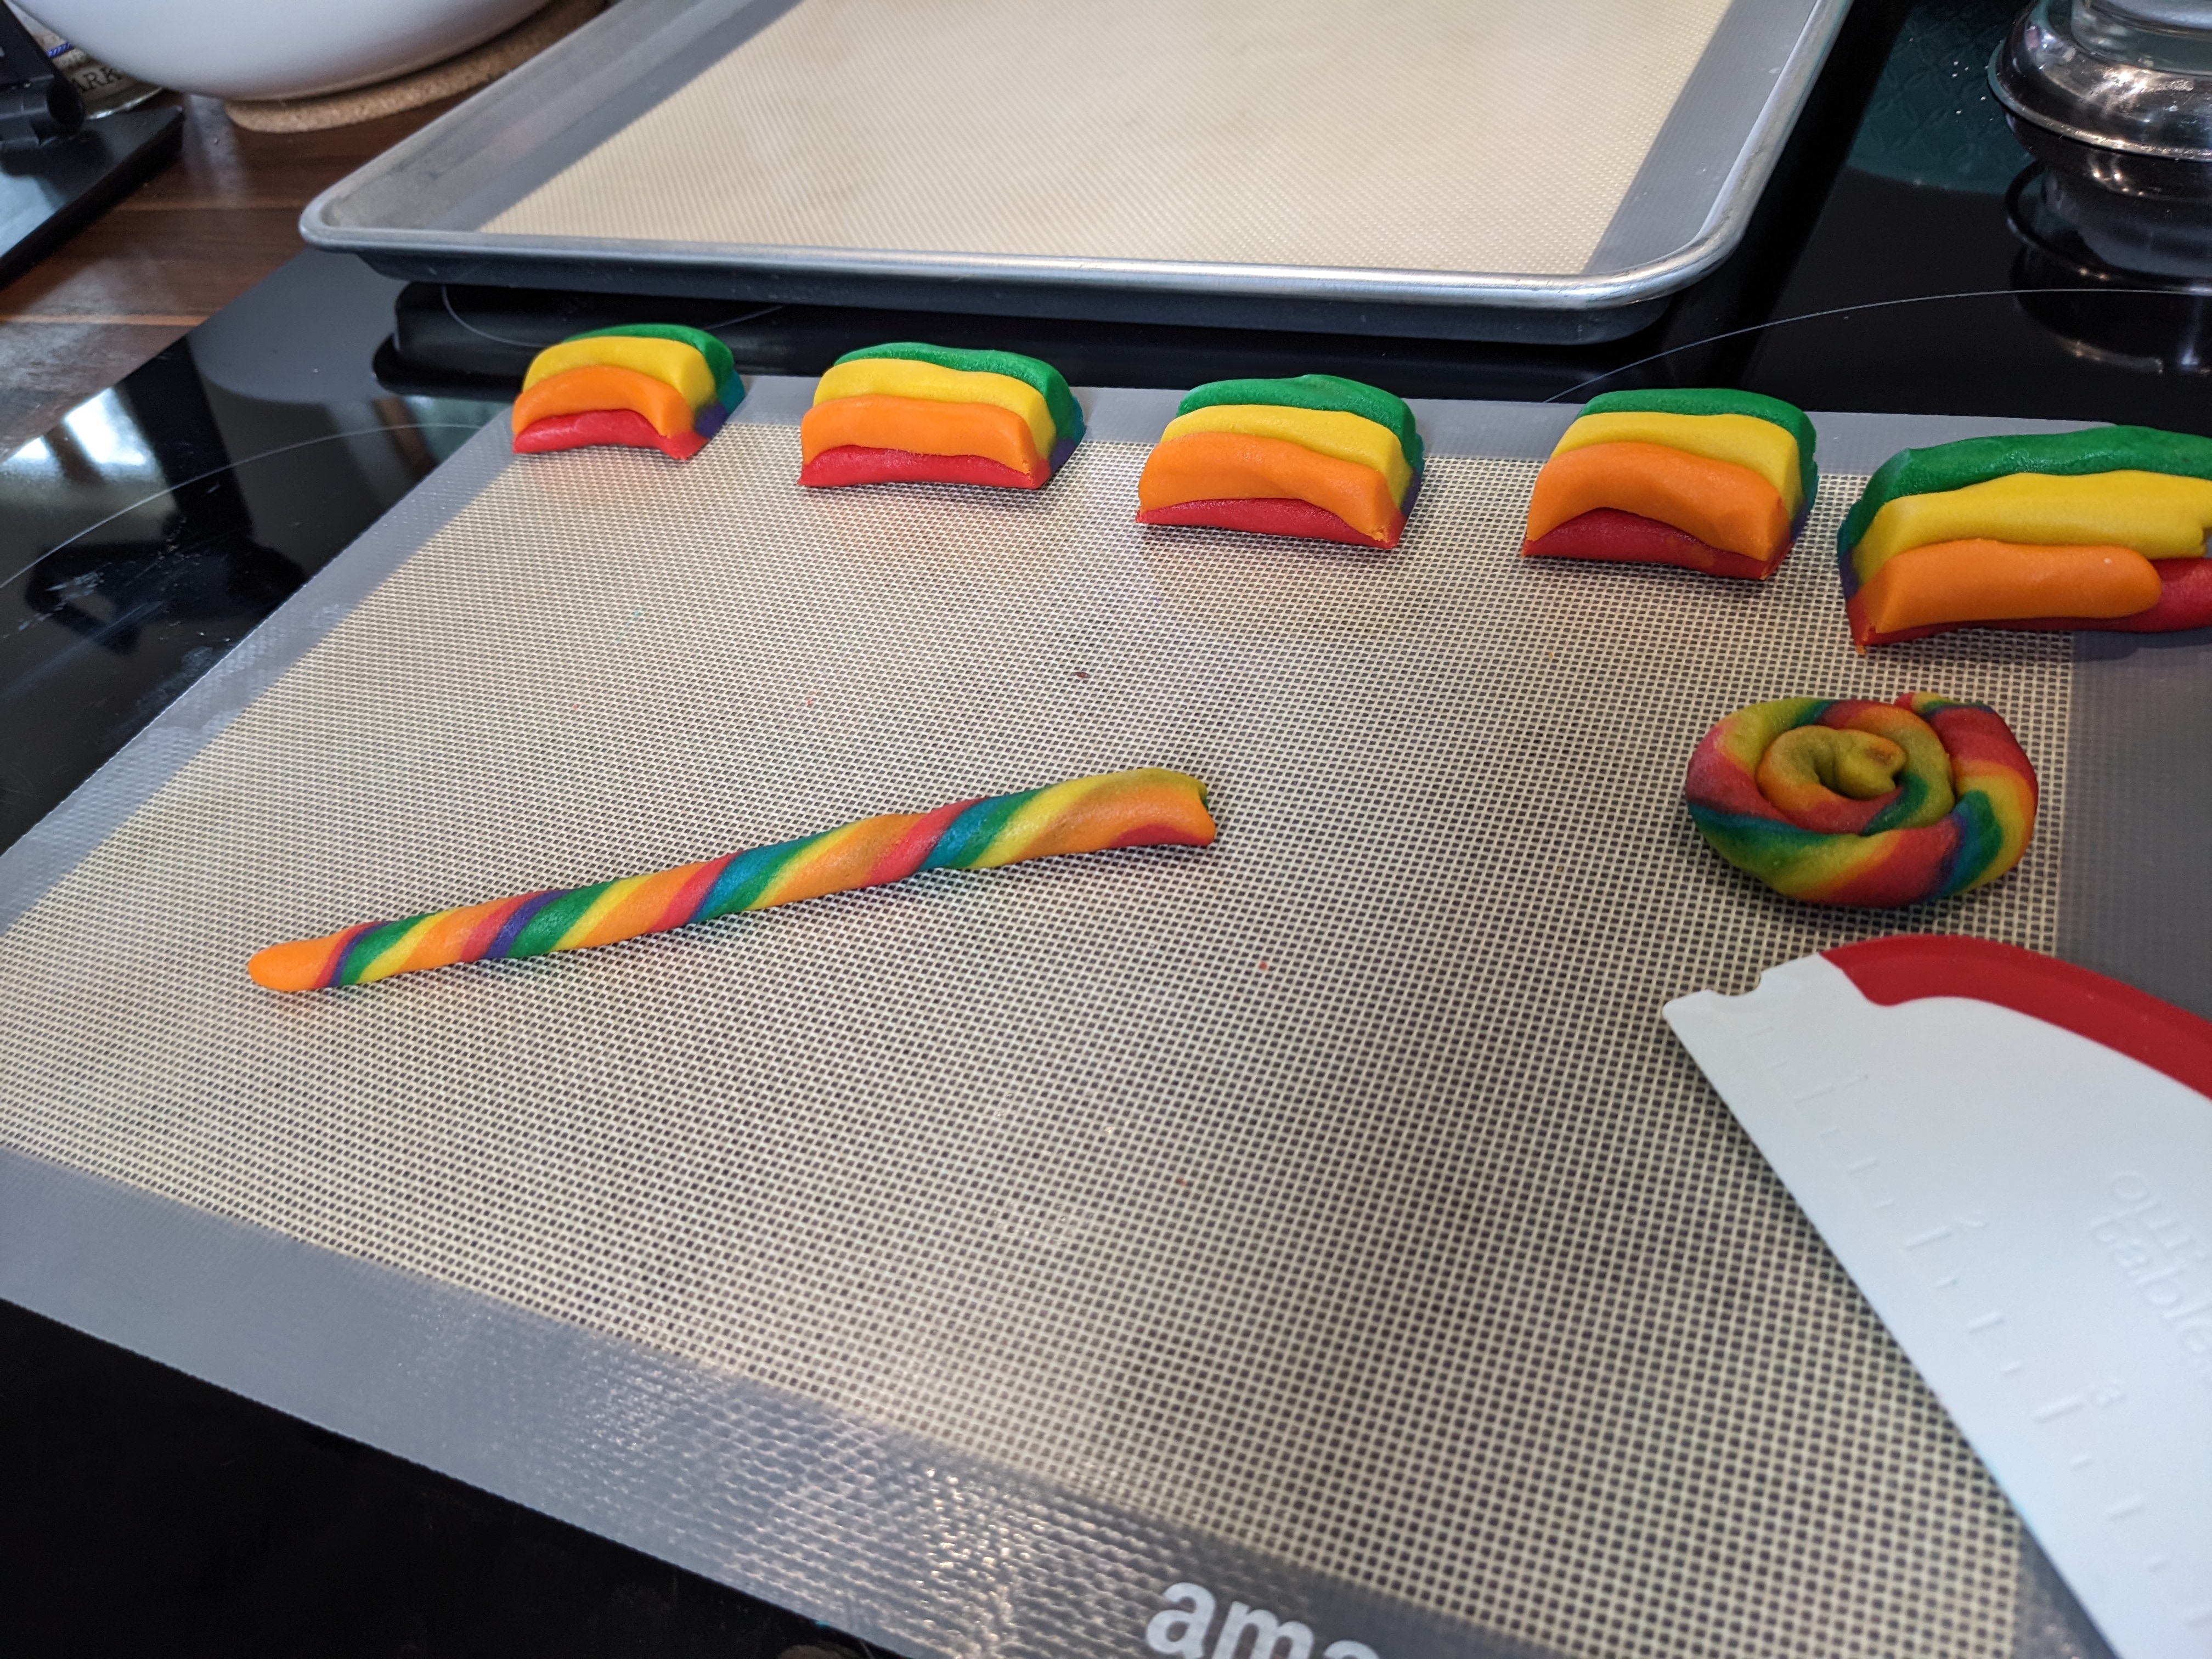
Roll each chunk of dough into a long snake/rope. Mine were a little thicker than pencils. They don't have to be perfect, as you can see, and the thickness isn't so important as consistency of thickness between them. So they can all be thicker or thinner, but they should be the same as much as possible. to get even distribution of color.


Gently roll and press the dough ropes together to create a multi-color tube.
Using a knife or bench scraper, cut this in half.

Then cut each of those halves into thirds, so you have six little multi-color rope bundles. Each of these will become a poop swirl!

Gently start to roll one little bundle into a long snake/rope again. For mine I'd say I was working toward a 5 inch rope or so. Using even pressure as much as you can will keep all the colors visible, but don't fret too much. They are gonna look great no matter what.


Now with gentle pressure, roll away from you on one side of the rope, and toward you with the other, creating the twisty color blend you see here. You will figure out now to manipulate it to get the result you want with a couple tries. Just don't use a ton of pressure, as we aren't trying to make the rope longer or thinner per se, just get the spiral effect.

Then take each rope and spiral it around itself. I chose to let mine be a flat spiral, winding from the inner coil to the outer coil. But some people pile it up more like what a poop emoji looks like, in which case roll it from the outer coil, upward and inward to the peak. For me, I was going to be pressing a chocolate kiss into the tops, so it wouldn't have kept that shape very well. If you are skipping the chocolate, you can try a piled-poo for more dimension.

Repeat with all the dough segments until you have your full complement of cookies. Keep the unused dough in the fridge until you are ready to work with it. As I filled a baking sheet, I would put it in the fridge to chill while I worked up the next batch, rotated that into the fridge while doing the next, and so on.

ESPECIALLY if you plan to pile up your swirl, refrigeration is VERY important. It will help prevent your dough from spreading and flattening as much. I refrigerated mine for 15-20 minutes (as long as it took to make each of the next batch into ropes) to firm it up enough to dip in rainbow sugar sprinkles. I used a little water spritzer to wet the top of each cookie, dipped the tops into a ramekin filled with the sprinkles, and then put back on the baking sheet.


Baked in a 350 degree oven for 8 minutes (as much as 10 if you sworl them up, since they will be slightly thicker cookies). If this is your last step, transfer to a cooling rack and let rest for about 10 minutes to set and cool.

I pressed a chocolate kiss into the top of each while still on the baking sheet, then used a spatula to transfer them to a cooling rack. Depending on how warm your house is, you can let them cool on the counter, or put them in the fridge to cool. The kisses can sweat and melt if the cookies aren't cooling off fast enough, so a 5-10 minute break in the fridge can combat that.

And there you have it. Sparkly, rainbow, crispy-but-soft, chocolate-kissed Unicorn Poop cookies! These positively flew off the plate, and onto friends' socials and then their faces. While I knew they would get kudos for how they looked (COME ON LOOK AT THEM!!!), I was so happy to learn that everyone was gushing just as much about the taste. My recipe was a flavorful hit, and you will find that below. Enjoy!


SHAY'S SPARKLE RAINBOW UNICORN POOP COOKIES
Makes 36 Poops

INGREDIENTS
Ann Clark gel food coloring in the colors you wish to use
1 cup butter, room temp, cubed (I used one stick salted, one unsalted)
1 cup sugar (I used white granulated sugar)
1 egg
1 Tbsp vanilla extract
zest of half a lemon (or more to taste)
2 tsp baking powder
1 pinch salt
3 cups all-purpose flour
decorative sugar or nonpareils/sprinkles (optional)
a bag of chocolate kiss candies (optional)

DIRECTIONS

  1. In a stand mixer, cream together butter and sugar until light and lovely, 2-3 minutes.
  2. Toss in egg, vanilla extract, and lemon zest and mix for another 2-3 minutes until well blended.
  3. Mix baking powder and salt into flour, and sift about one cup at a time into the cookie mix, scraping down the bowl between additions to make sure everything gets incorporated. Try not to overmix, just get everything uniform.
  4. Decide how many colors you want to use. Weigh dough and divide by number of colors, then portion and weigh out dough evenly into separate small bowls.
  5. Make an indentation in the dough ball, squeeze a couple droplets of your gel color into it and close over the top. Using a silicone spatula or other non-absorbant mixing tool, gently press and fold the dough to get the gel dye started mixing into the dough. 
  6. Form each colorful dough ball into a little burrito/fat tube, wrap in cling wrap or parchment, and chill in the fridge for 20-30 minutes.
  7. Take out dough, using a knife or bench scraper, cut into thirds. Keep 1/3 of each color out to work with, wrap up and put the rest back in the fridge to stay cool until you use them.
  8. Roll each individual colored dough piece into a long rope. As each is finished, line them up in whatever order you want them to be in, lengthwise.
  9. Roll all colors gently up into a multi-colored tube, pressing together lightly.
  10. Cut this tube in half, then each half into thirds, making six colorful bundles.
  11. Roll each bundle into a 5" rope. Then roll the ends in opposite directions to make the colors spiral.
  12. Roll the rope around itself in a spiral--either outward-in, stacking up like a coiled snake; or inward out, flat around like an old fashioned lollipop. Press the end gently onto the outer edge to make the cookie more round.
  13. Chill cookie spirals in the fridge while you pre-heat your oven to 350 degrees.
  14. If adding sprinkles or sugar, lightly wet tops of refrigerated dough with water using a brush or spritzer bottle (a friend suggested brushing with egg white, which I really want to try sometime to see if it gives them a sheen!), then dip top down into a ramekin with your topping of choice. 
  15. Bake cookies for about 8 minutes for flat cookies, 10 minutes for piled cookies (your oven may vary). Remove from oven, and if adding chocolate kisses to the tops, press them into the centers now while on the baking sheet. Then immediately transfer to a cooling rack. Accelerate cooling if needed in the fridge.
  16. Marvel at the sparkle rainbow magic you just made!

Jalapeno Popper Chicken Rollup

by Monday, April 03, 2023

2 large chicken breasts, sliced horizontally into two long/wide pieces (making 4 pieces)
4 oz cream cheese, room temp
3 oz cheddar (or Mexican cheese blend, or your choice)
2 Tbsp chopped green onions (1 full onion whites and greens)
1 large jalapeno, chopped finely (or two smaller)
4 oz spinach, gently wilted and chopped finely
2 tsp minced garlic (gently sauteed in a little olive oil to reduce bite)
1 tsp zest of lime (optional)
1/2 cup breadcrumbs (Italian whole wheat or whatever you have)
1 lime, juiced
1 Tbsp olive oil (plus some for cooking)
salt and pepper
toothpicks

  1. Preheat oven to 450. Lightly oil (spray or brush), or line with parchment paper, and set aside.
  2. Put chicken halves between two pieces of cling wrap, pound to even thickness
  3. In a bowl, combine all ingredients up to and including lime zest.
  4. Season chicken with salt and pepper, spread 1/4 of the mixture on each, with about an inch left uncovered at each end. Roll up firmly and seal with two toothpicks each.
  5. Prepare a bowl of breadcrumbs, and a second bowl of lemon juice and olive oil, seasoned with a little salt.
  6. Dip chicken in olive/lime/salt mixture, then breadcrumbs, then place on prepared baking sheet.
  7. Bake 25 minutes, serve immediately.
Serve over cilantro lime rice (or on the side of Fiesta Rice). Drizzle with avocado crema (below), garnish with cilantro leaves.

1 medium avocado 
1/2 cup sour cream or Greek yogurt
2 tablespoons mayonnaise
1 tablespoon lime juice
1/2 teaspoon salt
1/4 teaspoon ground cumin
1/4 teaspoon garlic powder
1 Tbsp cilantro, minced (optional)


Sourdough Chocolate Chip Cookies

by Friday, March 10, 2023

 Sourdough Chocolate Chip Cookies

https://www.theboywhobakes.co.uk/recipes/2020/5/7/sourdough-chocolate-chip-cookie
Makes 25 cookies

225g unsalted butter, diced
220g caster sugar
220g light brown sugar
3 large egg yolks

380g plain flour
1 tsp baking powder
1 tsp baking soda
1 tsp flaked sea salt

240g sourdough starter discard (100% hydration)
1 tsp vanilla extract
500g dark chocolate, roughly chopped

DIRECTIONS

Brown butter to remove water. Let cool a bit.
In bowl of mixer, add browned butter and sugars and whisk until smoothed out any sugar clumps
Add egg yolks and whisk on medium 2-3 minutes
Add discard and vanilla, mix a few more minutes until smooth, like cake batter
Mix flour, baking powder, baking soda, and salt, then add to bowl. Whisk in a “pulsing” cadence until just blended/hydrated
Swap out paddle attachment and add chocolate chips
Remove from mixer, press cling wrap down on surface and refrigerate 3-4 hours (minimum, up to 24 hours) before baking

Heat oven to 350f
Line cooking sheets with parchment
Roll balls of dough and set out 6 to a pan
Bake 16-18 minutes
If puffy in the middle, rap tray on counter to flatten them a little
Allow to cool on tray 10 minutes then transfer to wire rack to cool

This makes 25 cookies. If you want to make less, cut in half, using only one egg yolk.
Dough can be frozen for up to a month. Roll into balls, freeze on a tray, then transfer to a bag.

Zuppa Toscana

by Thursday, February 09, 2023

I had never had this soup before in my life. I stumbled on it when I was doing one of my usual recipe searches where I type in a few ingredients I want to use and see what it spits back at me. In this case it was spinach and Italian sausage. I thought I would get only pasta dish suggestions, but I got this instead, and am so happy I did. I have made it three times in as many months now, enough to eat some now and more to freeze for later. It reheats surprisingly well for something with potatoes and cream in it. With a side of crusty bread and butter? YUM


INGREDIENTS
  • 4-5 slices bacon
  • 1 pound mild or spicy Italian sausage, casings removed (I love Isernio’s Hot Italian)
  • 1 small yellow or sweet onion, diced
  • 3-4 garlic cloves, minced
  • 4 cups ounces low-sodium chicken stock
  • 3 medium russet potatoes, peeled and 1/4 inch dice
  • 3 cups baby spinach (or kale, as you prefer)
  • 3/4 cup heavy cream

DIRECTIONS

  1. Cook bacon to desired doneness, slice into bite size pieces.
  2. Cook sausage and onion in bacon grease until onion is translucent and sausage is no longer pink. Pour off any excessive fats.
  3. Add garlic and cook until fragrant (1 min or so).
  4. Add the chicken stock and potatoes, simmer for 12-15 minutes until potatoes are tender.
  5. Add spinach and stir in, allowing to wilt down.
  6. Add cream, bacon (save some back to garnish if you wish), stir together, season with salt and pepper to taste, serve with crusty bread.


Creamy Sage, Chestnut, and Squash Soup

by Monday, January 09, 2023

I was in my late 40's when I learned to love chestnuts. That is, very recently, 2022. I'd never had them, okay?! My partner decided to throw some onto our CSA order one week and, while they take some work, they were a complete hit with both of us. He had also thrown some red kuri squash on an order, since we had never tried that either. 

The chestnuts got 'et that week, and the kuri squash was sitting there waiting for inspiration. I decided to get more chestnuts last week, throw in a butternut squash, and make some warm, creamy soup! Cross-referencing other recipes, this is what I ended up making (this would work with a wide variety of squash, this is just what we had):

1 lb chestnuts
1 small-medium red kuri squash
1 small-medium butternut squash
1 small shallot, fine dice
3 cloves garlic, minced
4-5 leaves of fresh sage, minced (2-3 tsp fresh, 1 tsp dried or to taste)
1 Tbsp butter
1 cup veg or chicken stock
3/4 cup cream
a splash of dry white wine
salt and pepper
Optional: goat cheese or creme fraiche for garnish

Score and roast chestnuts
Roast nuts on a rack-lined sheet pan in a 450 degree oven for 35 minutes or until tops are peeling back. Put chestnuts in a kitchen towel, squeeze to crack/release shells. When cool enough to handle, extract the meat and remove papery skin as well. Finely rough-chop nuts and set aside. Meanwhile...

Roast squash in 450 degree oven.
Cut butternut squash in half and scoop out seeds, oil lightly and place face down on a foil-lined baking sheet. Cut red kuri squash in quarters, scoop out seeds, and then cut one more time into eighths. Oil and place on the same sheet pan. Roast for 25-40 minutes until soft and mashable. The red kuri was done before the butternut squash, so I just removed them to a plate and let the butternut squash continue a bit longer. Scrape flesh into a bowl and mash up. You don't have to mash too much here, since you'll be blending the soup more later.

Cook shallots and garlic.
Melt butter in a pan over medium heat, cook shallots a few minutes, add garlic and cook until fragrant. Add sage and chestnuts, to bloom the sage a bit and warm and soften the chestnuts further, 1-2 minutes. Add more butter if it seems too dry. There's always room for more butter!

Put it all together.
Add squash, stock, shallot/garlic/herb/chestnuts mix to a pot and stir together. Splash some white wine, and add cream a bit at a time, saving some back if you're not sure of the consistency. Before soup is hot, use immersion blender or regular blender to blend together all ingredients until smoothed (mine still had small chunks of chestnut in it, that was fine with me!) Never blend piping hot soups, it is a splash/burn risk. Blend while warm, then heat to desired temperature once it is blended, adding more cream if needed to reach desired consistency. Mine was a bit thick, but you may want yours thinner. Add salt and pepper while heating, to taste. I like a lot of fresh ground pepper in mine, to counterpoint the sweetness of the squash and chestnuts.

Ladle soup into bowls, top with goat cheese or creme fraiche as desired.

This goes great with a rustic, crusty bread if you have it!

I was amazed at how naturally sweet this soup was. Some recipes call for a little sugar in them, and I can't imagine needing it, with the sweetness of the squash and nuts already being so strong.


A Christmas Recipe for Romance - Holiday Movie Musings

by Tuesday, November 22, 2022

Can you learn to cook improvisationally under high pressure in just two weeks!? Let’s find out in A Christmas Recipe for Romance!


This movie has everything you’d expect. 

Big city guy hates small towns, but here he is for at a small town inn for vacation. He’s a famous, bitter, rude celebrity chef. 

Small town girl runs the inn. It’s grandma’s inn! She’s hopeless at cooking; famous for it, in fact. Don’t let her near a kitchen, friends!

Oh no, we need to save the inn! Coincidentally, we JUST booked the entire cast and crew of a live cooking competition in our inn. A crew that suddenly decided, just weeks before airing, to film this year’s event in this little town. Oh, and they still haven’t settled on the “hometown flavor” guest who gets to compete, so there’s still time to apply to be on the show. The prize money is almost exactly the money we need to save the inn. TODAY IS THE DEADLINE!

Famous, bitter, rude celebrity chef who vowed never to enter a kitchen again reluctantly agrees to coach hopeless small town girl in cheffing so she can win competition, to save the inn. Step 3: romance!

The entire set is red on red on red on red. Couches, clothes, decor, mugs, just so you don’t forget it’s Christmas (even though the entire plot has nothing to do with Christmas). The music is all Christmas music. Everyone wears Christmas aprons, and Christmas pins on their lapels. DON’T FORGET, IT’S CHRISTMAS, EVERYONE! At the finale competition, they announce the surprise cooking theme. Out comes SANTA to announce the theme is “FAMILY CHRISTMAS!” What a shocking turn of events. Incidentally, no one really cooks anything Christmas-y.

Will a movie poster with the two main characters snuggling, under the title with the word “Romance” in it, produced by Harlequin novels/movies, end up with a happy ending? Tune in to fund out!


#HolidayMovieMusings


The Christmas House - Holiday Movie Musings

by Monday, November 21, 2022

I loves me some sweet gay couples in these movies, and this one delivers, at least in side characters.


Our main character is a star of a popular TV show, returning to his family home for their traditional (and final?) Christmas House celebration. They decorate like the Dickens (get it?! I made a funny!), and are known around the town as the place to be for the holidays to see lights, decor, and displays inside and out. But this year, Mom and Dad reveal they are selling their house, like…super soon. And this is the last Christmas House, forever!

Other storylines: The brother and his husband reveal they are trying to adopt. Main character reconnects with this best friend and never-was love interest from his childhood. There is magic (literally, with Chris Gaultier of Eureka fame playing a local magic shop owner) and heartache and family and joy. Can’t say I was riveted, but I was entertained. 

Oh and while I expected the Christmas House to be dressed up excessively, I was not expected for a completely different house to have every surface decorated, including FOUR Christmas trees (that I counted in the background). Who casually decorates their personal home with this intensity? Intervention time.

And I just learned that there is a Christmas House 2 that came out in 2021; and Chris Gaultier is in that, as well as a movie called Three Wise Men and a Baby which I now have to go find and watch as well, naturally.

#Hulu #HallmarkMovies

#HolidayMovieMusings

Falling for Christmas - Holiday Movie Musings

by Sunday, November 20, 2022

Falling For Christmas: AKA Overboard for Christmas, but without the moral complication of purposefully hiding the amnesiac and pressing them into laboring for you against their will.


The opening of the movie did its job. Man, I was cringing at Lohan’s character and everything she said and did. Good job making us unsympathetic to that character. But later, I was reminded all the talent Lohan still has for being gentle, funny, and charming. So yeah, it’s hard not to gawk at her plastic surgery at times, but when they soften her image and makeup, and let her play someone “real”, I was drawn right in.

Chord Overstreet (Glee) did a fine job as well. Jack Wagner continues to look like he has magically slowed aging, and fun to see Lohan’s sister Ali play a role as well.

Side comment: well played having Lindsay sing along to Jingle Bell Rock. #meangirls

#HolidayMovieMusings

Holiday Date - Holiday Movie Musings

by Saturday, November 19, 2022

Holiday Date, another Hallmark movie based on a woman who can’t bear to face her family without a man on her arm. I mean, HOW EMBARRASSING!


Female lead is Brittany Bristol, who seems to be an actress who does movies Like These. All the Hallmark, Lifetime, etc type movies. Her bio is filled with them. Male lead is Matt Cohen from Supernatural. Bonus Bruce Boxleitner (Tron) and Teryl Rothery (Stargate SG-1). 

Actor dude is convinced to go home and pose as small town girl’s boyfriend (who broke up with her less than 24 hours before Christmas. Whataguy!). Romance ensues. I liked it well enough. Check it out.


The Christmas Train - Holiday Movie Musings

by Thursday, November 17, 2022

 Holiday Movie Musings begin!!


I'm starting one week early because frankly there are so many new free available holiday movies this year. I have work ahead of me.

The Christmas Train is first, with Dermot Mulroney, Kimberly Williams-Paisley, Joan Cusack, and Danny Glover. This is an all-star lineup by Hallmark movie standards!

Live comments:

2017 and it shows kids sledding on the Capitol lawn in the opening credits. It's already so so old.

He is just now getting on a cross country train for a trip to California. Did no one tell him this week take FOREVER?! (Okay, three days, but his girlfriend thought he was flying, so that’s LIKE forever.)

This guy is quite the Chatty Cathy. He’s met, like, everyone on the train in the first 2 hours. I know he’s sniffing for a story, but this train seems like it is chock full of friendly extroverts. What a nightmare.

These are the fanciest train cars. Wowsa, so much room! And the conductor lady is so attentive!

Wait, are people really standing around watching at chess match in the bar car and applauding moves? No that couldn't possibly be a thing they decided random people do on trains.

That ending. Wow. His California girlfriend is the most understanding and helpful lady ever, apparently. What an alarmingly expertly executed plan by Danny Glover’s character.

Yeah, I recommend it. It’s cute enough for one watch.

#holidaymoviemusings

Dutch Oven Whey Boule Using Poolish

by Monday, September 12, 2022


First, the recipe as originally written, from this PDF. I have transcribed it at the end of this post, in case the link ever dies.

What I Actually Did

Overnight poolish (ingredients for one)

  • 250g all purpose flour
  • 250g cool whey (straight from the fridge)
  • 1g Active Dry Yeast

Remaining ingredients 

  • 240g bread flour 
  • 30g hard white wheat flour (stone ground) 
  • 8g salt 
  • 6g Active Dry Yeast 
  • 125g warm whey (microwaved until warm to the touch)
  • 50g honey 
  • 50g butter, softened 

Let poolish rest under cling wrap in a bowl for 14+ hours up to 24 hours. Warm whey in microwave at half power until warm to the touch, not hot. Add honey and yeast and stir to incorporate. Let rest 10 minutes. Measure out other flours and ingredients into large tub so there is room for the rise. Add softened butter to melt in warm whey/yeast mix. Incorporate whey mix and poolish gently into the flour and salt in the tub. Mix and squish until dry ingredients incorporated well. Does not need to be perfect, will be pretty shaggy and sticky. Using water on your hand helps, but still this stuff sticks. 

Cover and proof over 3-4 hours. In first 90 minutes, stretch dough every 30 minutes, pulling up edges and folding into middle. Then just let it do its thing until you're ready for the final rest. It will double or triple in size beautifully!

Pre-heat French or Dutch oven in 500* degree oven (475 is fine, I usually account for lost heat during the time I transfer the dough, keeping the oven open for a minute or so). 

For this final rest, gently transfer dough onto floured surface. Stretch gluten cloak however you like. In this recipe, it pulls from the edges up to the middle, putting the "pretty" side on the bottom. You can also do it more traditionally, pulling the edges under, so the stretched gluten cloak is on top. So, too, when putting in a proofing basket, you can do it pretty side down or pretty side up. When transferring to your French oven, you can do it either way as well. 

HOW I DID IT: I did as the recipe called for, pretty side down to stretch and proof  in the basket on a well-flowered cloth. When turning out, I turned it pretty-side-up onto a piece of parchment paper. I sliced the top in a swirl with a wet knife. Using the parchment paper, I lifted it gently into the French oven and covered with the lid.

Decrease temp to 475 after transferring the dough. 35 minutes lid on, 10-15 minutes lid off until deep golden brown. Remove from French oven using the parchment paper as a sling, remove parchment paper and let rest on a cooling rack for 10-20 minutes. Don't cut in too early! You want it to cool enough that the crumb settles. This last bit of steam from the oven needs to stay trapped in there to have the bounciest crumb.

* Bottom of my bread turned a burned color, but did not taste overly burned. I think I would just have it at 475 the whole time after all, so the bottom doesn't get heated so much.

*************************************************

Original Recipe


Overnight poolish (ingredients for one)

  • 250g strong white flour
  • 250g cool whey 
  • 0.5g dried yeast or 2g fresh yeast 

Remaining ingredients 

  • 175g strong white flour 
  • 60g strong wholemeal flour 30g 
  • dark rye flour 
  • 8g salt 
  • 2g dried yeast or 6g fresh yeast 
  • 125g warm whey (40ºC) 
  • 50g honey 
  • 50g butter, softened 

Method 

The evening before mix the poolish ingredients in a large bowl so that the mixture will have 12 to 14 hours fermentation at around 20/22ºC. 

Next day start by dissolving the yeast and honey in a little of the warm whey and leave for 10 minutes. Meanwhile weigh out the remaining flours, salt and butter. Add the remaining flours, salt, butter in small pieces and warm whey to the poolish and mix by squishing between your fingers. Wet your hands first so the dough doesn’t stick. 

The dough is going to prove now for 3 to 4 hours, kept warm and covered. At the start of this time give the dough 3 folds at 30 minute intervals. Make the folds by going round the dough (in the bowl) pulling the dough up and out as far as it will go without tearing then folding it back into the middle. 

At the end of the proving, ease the dough out onto a floured surface. If you are making two boules now is the time to divide the dough. Go round the dough pulling an edge gently away from the centre then folding it lightly back into the centre. Do this till you have a neat high mound of dough. 

Lay the dough, pretty side down in a well floured proving basket or bowl lined with a well floured tea towel. Let it prove for about 40 minutes in a warm and moist place (covering the dough bowl with a larger bowl works). Around 20 minutes in advance heat the oven to 240ºC with the casserole plus lid. Gently tip the dough onto floured work surface. 

Take the (VERY HOT) casserole out of the oven, pick up the dough with well floured hands and ease it into the pot. Replace the casserole lid Bake at 230°C (fan 220ºC) for 35 minutes. Remove the lid and bake for another 25 minutes. 

Overnight poolish ingredients for two: (literally just double all ingredients)

Neighborhood Happy Hour Joy

by Tuesday, August 30, 2022

 Wonderful neighborhood Happy Hour last night.

One of our neighbors brought their parents visiting from Bangalore, and said the weather in Seattle right now reminds them of home.

Talked to other neighbors about their trip several weeks ago to Portugal.

Our newest member of the community--baby Bodie, born two weeks ago--was brought by his radiant momma along with his three older sisters. There were adorable littles and dogs everywhere.

He was passed around from one loving friend and neighbor to the next for a little brand-new-baby therapy. He has six fingers on one hand, and I told him I knew a pirate who was looking for him.

Met neighbors I hadn't met before and their almost-2-year-old son, who fixated on me the moment he arrived. He munched his slice of watermelon by my side, trying to offer it to share with me. I demured. I am told he is very shy and takes a long time to warm up to people, so everyone kinda marveled that he made me his pal immediately. I mean, he had a dinosaur shirt on. He's my people!

Food brought included slices of mushroom flatbread, heirloom tomato bruschetta, gyozas, lots of fresh fruit, and individual cups of German chocolate cake.

A couple of hours in the sun with a wonderful group of people I am lucky to call my neighbors. I crashed hard in bed at 9:30pm (I normally go to bed at midnight), but it was worth it the energy expenditure to join in the fun.


Evolution of Language: ASL

by Wednesday, July 27, 2022
My friend Jonobie shared this excellent NYT article over on Facebook by Amanda Morris, a CODA (Child of Deaf Adults). This touches on something I have been experiencing--and MOSTLY enjoying--about re-engaging with my Deaf culture studies and studying ASL again.


I was in an interpreter program back in the 90's in Seattle. At that time in my school, social justice, gender identity, and even LGBTQ+ signs were not in common use enough to be taught as part of the program. So I never learned terms for concepts we use more commonly today, like "trans" or "gender identity",  or even the phrase "social justice" itself! Emergent phrases like "Black Lives Matter" have been added and changed in just the last few years and are now common parlance, but still not universally settled upon. For instance, I learned from my Deaf black ASL instructor to use the term "cherish", while others use the term "important" in the same phrase. And there may be different signs for concepts based on if you are a member of that culture or not. The sign for "Black" in this same phrase has a variant which may be used by POC, but is not appropriate for white people to use--like using "the n word" is okay for those of the culture and definitely NOT if you aren't. ASL has similar rules.

I took a short class last summer which was taught by a Deaf Queer drag queen, and there was a lot of emphasis on these newer signs and increasingly common-use concepts. My instructor before that, at the beginning of the pandemic, was a queer black woman, and she, too, gave us a lot of social justice vocabulary. These were concepts that were important for all of us to learn quickly, given the George Floyd demonstrations were going on all over the globe and the landscape of language was shifting before our eyes as history was being made.

This article touches on the sign for phone right from the jump, which is familiar to me. My signs for phone, computer, video, and more were all outdated. My sign for dog was already a hybridization of the old and the new sign, so now I can just drop the awkward first half (patting the thigh), which doesn't read on camera. And some common concepts don't even have agreed-upon signs yet. For instance, some people spell out "Netflix", while some regional signs have popped up. No single one of these has been widely adopted enough yet to settle into the lexicon. Somewhat related to this, I recently learned that the Art Director at Amazon, Michael Nesmith, is Deaf--a fact I discovered when I went to look up if a sign had been codified for Amazon. He made a video showing how they sign it internally. (He also has a TED Talk on the importance of Universal Design, HERE).

My teachers have been great about imparting this information, often showing the old and new sign side by side and helping explain why the change, if it wasn't obvious. And there are still localized variants, where from teacher to teacher I learned different signs because of where they first learned ASL, or what their immediate community have adopted. Thanks to the ubiquity of online remote learning, in the past two years I have taken classes with teachers in Michigan, Rhode Island, and once even from Mexico. Their vocabulary and teaching approaches have all been unique, and I have found incredible value in this diversity of experiences to draw from.

All that is a longform way of saying that while it is challenging at times, I am for the most part enjoying seeing my own time-capsule understanding of ASL now evolving 25 years later. It can be challenging to change something ingrained for so long, but I can't help but be excited by seeing how language changes and adapts to the communities it serves.

Bonus link: A NYT article, also by Amanda Morris, about origins and meaning of ASL name signs.

Shredded Beef Ragu - like grandma used to make! (sort of)

by Sunday, July 10, 2022

I promise this won't be a long story. As briefly as possible:

My grandma made spaghetti we all loved. We kids begged for it to be the meal every time we came over. She joked she would only leave us the recipe in her will. She passed away, we have three slightly different versions of a recipe she hand-wrote, and literally none of them have ever tasted like her spaghetti when prepared as written.

After many attempts to doctor it up to try to make it taste right, no manner of tweaks helped. It just tasted like brown ground beef in tomato sauce (excuse me, the recipe called for "chop meat"!). The closest I ever got was when I took a big extra step and made the braciole, which she always made but I didn't eat as a kid, and have no recipe for. I tried several times making recipes for braciole FROM THE INTERWEBS, and the braciole was always delicious, and the sauce was the closest it ever came to tasting like hers. "Chop meat" and meatballs were always in her sauce. Was ground meat all that different back in her day, I wondered? It is still a question that lingers, but...

Skip ahead about 15 years and I find this recipe from Sam The Cooking Guy for an Instant Pot short rib ragu. I whipped it up and...my eyes nearly popped out of my head. THIS tasted like grandma's spaghetti sauce! Or at least as close as I have ever come, and pretty far from my last memory of actually eating it. I realized then and there the base sauce was pretty blah, it was in fact the seared beef (from the braciole, and in this case the ribs) that brought all the flavor. And while I love braciole, it is a Whole Process to make. So to figure out I can just use certain cuts of beef (*more on that in a second), and cook the hell out of it until it is tender and releases all the beefy flavor into the sauce...I'm in heaven.

Instant Pot means I don't have to cook it all day long. *And I discovered that I can use bone-in beef shank instead of short ribs to cut the cost 75%, and get MORE meat.
3 lbs Beef short ribs=$10/lb, a large part of that is bone = $30
2 lbs Bone-in beef shank=$5/lb, only one big center bone = $10

The shank still has some bone in there, and I am certain that some of that marrow getting into the sauce also contributes to flavor and mouthfeel. There is less fat on the shank that the ribs, but I find that to be a positive in this case. The flavor was not really changed, and I did way less skimming of the fat from the surface of the sauce at the end. I included the ingredients/instructions for both.

So without further ado:

INGREDIENTS

2 lbs beef shank or 3lbs pounds bone-in short ribs (if ribs, look for ones with lots of meat – I know this seems obvious, but if you don’t really scope them out, you'll wish you had more meat later)

Kosher & pepper

1 tablespoon oil

1/2 cup each diced carrot, celery, yellow onion

3 large cloves garlic, minced

1/4 cup tomato paste

1/2- 3/4 cup red wine, (and I don’t care what any says, even a less expensive one will be perfect)

1 28 oz can chopped San Marzano style tomatoes

1 tablespoon beef stock paste, or a beef bouillon cube

1/4 teaspoon crushed red pepper

1 tablespoon dried oregano

Good pinch kosher salt & pepper


DIRECTIONS
Turn instant pot on to the sauté setting

Season the ribs with salt & pepper, add oil to the pot, and when hot sear the ribs in batches until brown on all sides – remove & set aside

Add the carrot, onion, celery and garlic - sauté until softened 3-4 minutes

Add tomato paste, mix well and let cook a few minutes, then stir in wine, scraping along the bottom as you go to release anything stuck on – 2 minutes

Then in go the tomatoes, the beef stock or cube, the red pepper, the oregano and salt/pepper

Stir well to combine then put back in the ribs

Lock, turn to sealing position, select high pressure and cook 45 minutes

When it’s done, let the steam release naturally

Remove the short ribs, turn pot to saute, and let the liquid simmer to thicken

Shred, the beef and return to the pot when it’s thickened, 5-7 minutes

Check salt & pepper, adding if necessary and serve, on pasta, on polenta, on almost anything – maybe adding some parmesan to garnish

Dear beautiful grandma...

by Wednesday, June 29, 2022

 From my Livejournal, April 25, 2005

So I woke up today to phones ringing. I hate phones ringing. The night my father died, I knew that call was important because not only was it late, but first my home phone rang....then my cell phone...then my work phone. Anyone who has all those and tries them has something important to tell me. It was never THAT important until the night they called to tell me my Dad was dead.
So when the home phone, then my cell phone, then my work phone rang, I was checking to see who it was as Chris' cell phone rang. It was my sister and I called her back. Seems Grandma has pneumonia, and they have her on antibiotics. But when Ev consulted G-mas wishes for life-saving measures, she lists antibiotics as a no-no. Ev was calling all of us sibs to poll us as to whether we believed the page said what it said, and how we wanted to handle it. We are all in agreement that this would be a life-saving measure she has asked not to be given. So we are telling the doctors to stop giving her antibiotics, and we will see how she does...

Ev was in "practical" mode, and commented that it would probably hit her hard later. I told her if she needed company, Chris and I would come be with her. Ev had moved G-ma to a facility in Des Moines, and has been staying nearby all week. She took us up on it, and after a late breakfast we drove down to see G-ma and Ev. Ev had had a really hard cry before we got there, and was back in practical mode.

Grandma is small and tired, but of good color. She can't really speak, and is not really cognizant anyway. She would sometimes nod, sometimes mumble something, would freak out if you tried to move her even a little bit, and looked so tiny in that bed. She didn't seem to recognize me at all, and was fading in and out of sleep, partly due to a combination of vicodin and oxycontin they have her on for her hip pain. She is also sometimes on oxygen, being given insulin a few times a day due to abnormally high blood sugar levels, and goes on a medicated breather a couple times a day to help keep the plegm in her chest from solidifying. She trembles a lot, and has a look like she wants to say something, but says nothing, and her eyes drift shut.

I sat on the bed and held her hand, studying her face. Even as drawn and marked as it is at this time, she is so beautiful to me. Her silver and black hair so sparse on her head now, so silky to the touch as I stroked it and looked at her. I wonder what she thought of this stranger touching her with such familiarity and gazing at her with a half-smile as I did, but she didn't push me away or seem irritated by me. As I stroked her hair, she seemed to drift into a comfortable sleep, but her eyes would pop open when I stopped. Her skin felt soft and elsatic, but fragile and thin. Her lips tremble a lot, and her brow furrows in frustration, but her eyes don't focus on things much, and she lays awkwardly in the bed doing nothing. She can't hear you unless you lean in and yell, and I fear I will startle her if I do that too much. Hell, the sound of my own voice sounds so harsh and startling to my own ears in this quiet place. I feel completely at a loss as to what I am supposed to do. So I just try to touch her and let her know I am there...somehow.

We go grab an afternoon snack at Anthony's in the Marina, sitting in the spring sunshine having a drink to calm our nerves. We talk amiably, and enjoy the smell of flowers and ocean. We drop back in on Grandma briefly to see how she is doing, and she is unchanged. The nurse comes in and pokes her harshly with an insulin needle. Grandma, startled and pained, yelps out, her trembling fingers trying to reach the point of the puncture, but not having the strength to rub her wound. She begins to cry, and Ev wipes her tears and tells her it's okay. "We're here, Grandma," she says, stroking her hair back and kissing her forehead. "We're here. Calm down. It's okay." I hold her hand and feel helpless.

Ev is gentle and patient with Grandma. She puts on her oxygen tube, and sits her up slowly. She is obviously wanting to hear something from Grandma. Some sign that she is lucent, and understands what choices are being made. At one point, Grandma's eyes take on a brief, seconds-long clarity, and she quietly but clearly says, "I understand..." and trails off. "You understand what, Grandma?" Evelyn yells, taking her hand in her own and kissing it gently. "I understand..." but she can't seem to finish the thought, let alone get the breath in her fluid filled lungs to finish a sentence. Unspoken, I know we both wish we could believe she was saying she understands that she is on the brink of the abyss, and she understands that we won't pull her back because she asked us not to. We hope that her words mean she understands that we love her, and that we want the best for her. That we don't want her to go, and in our hearts know that she wants to go, and so we will let her. We pray that it is her somehow surfacing from the deep waters of her muddled consciousness to tell us "It's okay." But there is no guarantee that her words meant anything at all...

We decide to head to Saltwater beach park for a stroll. We take our cameras, but there is little of interest to photograph. We chat, pet dogs, and leave. We aren't hungry yet for our favorite Chinese restaurant, our intended dinner destination, so we need to kill some time. We decided to drive around Burien, looking at how much it has changed since we lived there. We go past the old house I lived in after Evelyn had long since moved away. We drive past schools and shops, reminiscing about our childhood, and marvelling, as we always do, how two sisters' lives can be so different thanks to the 10 years that separate our age. And yet, so much of what we remember is the same. Like Wah Ku's, were we head next.

We eat a meal far too large to be eaten so soon after our appetizers and beers on the deck, but it's so delicious we can't stop eating. We roll out of there with overfull bellies and a bag full of leftovers to last several days' lunches. Chris and I drive Evelyn back to the facility, and go up to see if Grandma is awake. But she's not. She is bright red--too hot from the coating of blankets they have on her. Evelyn gently peels back the blankets and wakes Grandma to say hello, but she is too tired to open her eyes more than a second or two. I sit on the bed and rest my palm on her forehead. "Ooh, you're cold," she mumbles and almost smiles. She never opens her eyes and she doesn't say anything else. I tell Ev I don't want to bother her any more, and we say our goodbyes and leave.

On the drive home, Chris asks me how I am doing. I can't find enough words to thank him for being there all day. Never once seeming impatient, or mentioning the dozen errands we were supposed to run that day. He doesn't bring up the work he was supposed to do this afternoon, and instead has to go into work early tomorrow to complete. He never sighed heavily, trying to let me know how much he would rather be someplace else. He never did the things I would do in his shoes. I am unworthy...in the best most blessed way. I want to be more like my husband. He is a good man, and a remarkable human being....

So that was my day. I got to see my beautiful Grandmother. Maybe she saw me. I think in some way she did. I hope to see her again before the end. I do and I don't... I was pleased to realize as I studied her face that I would not only remember her this way. that was my greatest fear. That the image of her today, weak and delirious, would scar my other memories of her. But it didn't. I added it o my memories. She was beautiful...

Shay's Totally Mundane Product Recommendations - Food Waste Bin

by Thursday, June 09, 2022

 I will never be an influencer, for many reasons. But a primary reason is my recommendations would be so utterly mundane. So here I am, sharing a couple awesome products I have enjoyed, which are very, very boring indeed.

FOOD WASTE CONTAINER - Joseph Joseph Stack 4L Food Waste Caddy

I have had many food waste container solutions. The most common one I see around is roughly the shape of a scaled down garbage can, looking like any minute a scaled down muppet would pop out of the top. I always felt that those were too narrow at the top, and larger food waste wouldn't fit well. They were otherwise fine, but just didn't work well for me.

When I moved into the new house, I tried an OXO brand one which was more of a tall rectangular shape. It was better, but had no filter or way for it to breathe, so everything inside would get very soggy in short order. And though it looked fine, it was a bit more utilitarian than I had hoped for something that will sit prominently on my counter in an open concept kitchen.

Some algorithm got me with this one, from of all places World Market. I found it on Amazon at a similar price, free Prime shipping, and would arrive a week sooner, so I grabbed it. And I instantly knew it was what I was looking for! It even solved problems I wasn't seeking to solve, not knowing there WAS a solution to those issues.

Firstly it looks great. The color I love, and the form factor is a bit more modern and sleek. The plastic is matte and sturdy, and the handle is stainless steel. It all feels very strong and well-built. There is a filter in it, and replacement filters are cheap and easy to come by, but check out the filter SYSTEM. It doesn't have giant holes where fruit flies and other critters are drawn to it. There are hidden side ventilation for intake, and the top ventilation and filter area is very low profile, under the brand nameplate on top. It allows it to breathe, but without the gaping holes.

But the solution I didn't seek, but was glad to find, is the rim which hides the excess bag hanging over the edges, AND secures the bag in place more snugly. They have their own branded bags which fit more precisely, but we use Bio Bags. The rim/lid lifts off, you put on the bag, there is a little hole to tuck any excess bag edge into to hide it and make a more snug fit, then slip the rim/lid back on. Voila. Looks great, stays put. And bonus, separating the lid from the body makes both easier to clean.


So that's my Very Mundane recommendation today. If you aren't into the Amazons, this is sold many other places online and in store. And there is a door caddy version as well, which is slimmer and hangs inside a cabinet. Go forth and cook!


Not Me Any More?

by Saturday, June 04, 2022


This is a very difficult reality I live with now. And as my doctors have all alluded, it may be my reality forever. For instance, I learned recently that the first drug they put me on (and kept me on for a year, despite it being terrible for me) can cause permanently lowered cognitive ability. So we don't know if my struggle to read and comprehend things the way I used to is still the migraines doing that, or the drug. Still, the migraines are still every day, so it's impossible to extract one from the other.

And yes, sometimes physical and/or social activity makes me feel BETTER. And sometimes, like this week, it knocked me out two days in a row. I never know which it will be. So it is frustrating to try and plan. I feel like a constant flake. I feel like it's really hard to be my friend right now, because you can't rely on me. My energetic personality and my consistency has been a cornerstone of my self-worth. And for years I have watched it disappear in the rearview mirror.

Thinking back on the me that used to work two to three jobs and still dance and teach at night, direct multiple troupes, perform multiple times in a weekend while teaching and taking workshops, hosting afterparties on top of it all... I'm not talking about when I was 20-something. Much of this was me into my 40's, until my migraines. And now to barely be able to plan one relatively low-key thing without being sure if I will have to sleep it off the next day?

I don't feel like ME.

Shay's Hollandays...er...Hollandaise.

by Sunday, May 29, 2022

 I have yet to make a hollandaise at home. Well that's not entirely true. I attempted it once. It failed. My husband tried it one. It failed. So we never tried again and thought restaurant quality hollandaise was gonna have to stay in the restaurants.


But today Chris had a sous vide salmon holding to have with eggs for breakfast, and I decided to give hollandaise a try. And it worked!! I used a collection of recipes to kludge something together. A "guy on the internet" said induction stoves don't need to use double boilers because the low setting heat is so gentle, it won't curdle. And he used a hand mixer with the double blades. So I did that, to emulsify the melted butter streamed in at intervals.


Here's what I did:

INGREDIENTS

  • 2 eggs (room temp is best, one full egg, one yolk)
  • 1 Tbsp fresh lemon juice
  • 3/4 Tbsp white wine vinegar 
  • pinch of salt
  • pinch of cayenne
  • dash or white pepper
  • 1/2 cup butter (melted I used salted)


DIRECTIONS

Whisk egg and second yolk together with all ingredients except for the melted butter. Place in double boiler bowl or in small pan over low heat on induction. 

Continually whisk or mix with hand mixer until eggs begin to thicken and froth a bit. 

Stream small amounts of butter in at a time, mixing thoroughly before adding more. Sauce will thicken gradually, over about 2-3 minutes time. You can add more butter at a time as it starts to thicken, but if you're worried about breaking it, just keep it slow and at intervals until the end.

Best used immediately. If holding, put lid on and set off heat. Mine started getting a little seized after 20 minutes, but was still delicious. This makes quite a bit, maybe good for 5-6 plates of whatever you're dressing.


We had it with salmon and fried eggs for breakfast and it was AMAZING!!! Chris couldn't stop oohing over it. I am so happy I finally climbed this particular culinary mountain.

NEW CONSTRUCTION - we're doing it again!

by Tuesday, May 10, 2022
As of today, an important new construction project is underway. Hopefully this one will go a lot smoother than our last one!

For those curious: our neighborhood seems to have a lot of fairy gardens. I am guessing that during the thick of the start of the pandemic, families around the area decided to invite fairies to move in, to give kids something to walk around and enjoy when schools and parks were closed (we also have a Little Free Library on every block, sometimes two. No kidding!).


I knew we may be late to the party, but wanted to add to the joy of discovery for neighborhood littles. So I asked some fairy friends of mine if they were interested in taking up residence here; and it turns out, there is a shortage of fairy housing in Seattle! So the team is at work now, getting ready for the first fairy home at this address. At least this is a much smaller project to take on that our last one. Stay tuned...


Slow Cooker Shredded Pork

by Monday, May 09, 2022
My favorite, easiest food-prep thing is making a giant pork shoulder--as big as I can fit in the slow cooker--shredding it, portioning some of it for this week and some for the freezer. This takes me about 10 minutes of prep on the front end, and 10 on the back to shred and portion. The rest is waiting on the slow cooker to cook it up, and at the end waiting for it to cool down before portioning.

Last week being Cinco de Mayo, the grocery store had large bone-in Boston pork butt on a wicked sale, so I got one. It was so big (around 6 lbs), I had to throw out a small hank of meat I could not get to fit in the slow-cooker and keep the lid tight. You can cut think into 2-3 hunks of meat if it helps to fit it into your slow cooker.

Rub with cumin, rosemary, garlic powder, salt, pepper. Cinnamon and any hot spice you like also goes well (cayenne, chili powder, whatever).

Place pork fat cap up in slow cooker.

Toss in 6-8 crushed garlic cloves, a rough chopped white or yellow onion, and if you have oranges and/or limes, juice one or both, and throw the orange peel in with it (never the lime peel/rind, it can be bitter).

Pour in a 1/2 to 1 cup of chicken stock, or water if you don't have that. If I know I plan to have this as carnitas, I will pour in a jar of green salsa as well minus some to put on the tacos later. If you want to keep it more neutral, just stick with the ingredients I already mentioned.

Cover. Cook on low for 8-10 hours, high for 5-6 hours. I try to go the full 10 whenever possible, or start with two hours on high, then drop to low to speed it up a little and land somewhere between these timings. Unlike some cuts of meat, I have never ever had any issue with going too long with pork shoulder when on low, so you can finesse this.

Pull pork out with tongs and transfer to a wide, shallow dish or baking pan to cool a bit. If you did it right, it will absolutely crumble to bits as you're pulling it out because it is so moist. Shred, then add back some of the cooking liquid and stir up.

IF EATING NOW:
If eating any or all of this now, put whatever amount you want onto a baking tray and you can throw this baby under the broiler to get some crispy bits going. Turn frequently with tongs to get more crispy bits. 

IF FOOD PREP FOR LATER:
If you don't plan to eat this now and just are prepping for days and weeks ahead, let cool enough to portion into ziplocks/freezer bags, label accordingly, and voila! You have a bunch of delicious meals done with minimal hands-on time. Just defrost and either crisp in a pan or under a broiler before serving with your desired accompaniments.

Serve up for tacos, burritos, BBQ sandwiches, whatever. I love to crisp some up and serve with avocado and a fried egg on top for breakfast. YUM!

PLEASE VISIT MY DANCE BLOG!


On this blog I share my personal posts about cooking and knitting, travel and other musings; while I will blog about dance-specific topics over on the Deep Roots Dance blog:
http://www.deeprootsdance.com

I hope you will enjoy both my sites. Thanks for visiting!
Powered by Blogger.