Showing posts with label turkey. Show all posts

Turkey prep musings - Thanksgiving 2021

by Monday, November 22, 2021

We're in the thick of it now. It's officially Thanksgiving week, which means my counters and fridge are overflowing with ingredients, ready to tackle the mountain of dishes I plan to cook up this week, including all the necessary ingredients to make and freeze some leftover turkey pot pies.

Despite *Science telling us otherwise, our favorite has continued to be the Alton Brown wet brine. We have made many birds many ways in our past 21 Thanksgivings as a couple, including the pre-brining years, dry brines and wet brines of various ilk, the miserably attempted smoked year (threw the whole thing out it was so bad), the amazing sous vide year, and various combos of whole, pieced, and spatchcocked.

Every year we don't make the Alton bird, we regret it. We go a couple years without it, trying new ways, then do the Alton wet brine and go "yeah, this is the best for us." We experimented the last two years, and had resolved to do the Alton method this year--our first in the new house. But never content to Just Do The Thing Already, I had a thought...

We loved the meat of Alton's wet brine, but preferred the flavor and texture of the skin in the dry brine (not by much, but enough to notice). Could they work together? If we wet brine for 24 hr+ , then do an overnight light dry brine (with maybe some herbs?), to dry out the skin a bit and add flavor there, would that work? I can't imagine 8 hours in the fridge could undo all the moisture gains of the 24 hr+, but it would most certainly help the skin to dry and flavor up a bit more before roasting, right? Would it be TOO salty?

I can't find anyone talking about this, so probably this is a Useless Idea, but now I kinda wanna try it.
 
Also, I will be spatchcocking again, putting aromatics in a little foil nest under the center of the bird and a ring of stuffing around the outside. This is a method I developed for myself years ago when I discovered spatchcocking of poultry generally, and as well wanted turkey drippings to still flavor the stuffing without the food-borne illness concerns of stuffing a whole bird.


Photo of me with one of my early very successful turkey attempts! 2005?

Here's 2020, spatchcocked goodness:


Video of Alton's brine:
https://www.youtube.com/watch?v=KKr1rByVVCI

Written recipe:
https://www.foodnetwork.com/recipes/alton-brown/good-eats-roast-turkey-recipe-1950271

* Kenji throwing down the science that supposedly proves me wrong. But you can't argue with our taste buds, Kenji!! https://www.seriouseats.com/the-food-lab-the-truth-about-brining-turkey-thanksgiving


Shay's Favorite Turkey Recipe (and her personal tweaks)

by Friday, November 13, 2020
I've said it before and I will say it again:
Alton Brown's Brined Turkey?
Best. Turkey. Ever.

You can debate all you want about whether brining helps or not. I have tried many other recipes--dry brines, wet brines, unbrined, grilled, smoked, even sous vide--and every time we come back to this recipe as the absolutely best combination of flavor and juiciness. Period.

My only adaptation is I always spatchcock my birds now. Don't be afraid of spatchcocking, it is SO EASY. If worried, test it on a whole chicken before you try the turkey. I highly recommend getting poultry shears for turkey, as the thicker bird is harder to do with just knives or kitchen shears.


Quick Brine Tip:
Alton suggests putting your bird directly into a cooler. We did that, and it was a mess. It worked, but no thanks. We also did a food safe 5 gallon bucket, but without insulation (and not being willing to put it outdoors and trust a lid with a brick on it to keep it safe from critters), we struggled to keep it cool enough all night. We now get the largest roasting bag available--food safe!--make the brine and MAKE SURE IT IS COOLED BEFORE YOU IMMERSE YOUR BIRD IN IT. Do not put hot brine in with your cold turkey, that could put your poultry in the danger zone. Then drop the turkey into the bag and fill with the brine solution. Then we tie it off tight and place that into a cooler with ice, rotating it and adding ice as needed a few times throughout the 12-18 hours before cooking, for good measure. So much easier to keep at a safe cold temp, and simpler clean up.

I do use Alton's suggested "molded breastplate" foil tent over the top of the bird (outlined here) as it gives us the most consistent cooking results, but I personally remove it in the last 30-45 minutes of cooking to crisp up the skin a bit. I MUST have crispy skin, and his recipes just don't take that into account. I have not found that this dries out the breast in any significant way, and I get crispier skin. Don't like that chance of dry white meat? In the last 5 minutes of the 15 minute resting period, peel off the skin and saute it in a pan with a little butter. Then fist fight your sister over who gets to eat it all. Oh...just us, then?

Shay's Stuffing Tweak Directions:
  1. Line roasting pan with heavy duty foil (for easier cleanup later). Spray with cooking spray or oil a little with olive oil.
  2. Make a little foil boat for the aromatics, set it in the middle of the roasting pan.
  3. Put a ring of stuffing around the outside edges of the pan, reserving any you want to keep vegetarian.
  4. Place spatchcocked turkey on top of bed of stuffing (or you can put a rack on them and the bird on top of that for easier removal later for the rest period) and cook for recommended time.

This makes stuffing with the turkey drippings dripping on them throughout the cooking process--making the stuffing taste like "stuffed stuffing" without the salmonella risk or turkey meat drying out--while allowing you to have an aromatics component that would have been unseated by a pile of stuffing.

You can also have part stuffing, part cubed potatoes under the turkey if you wish. They also absorb the drippings and become soft and flavorful. If you want crispier potatoes, at the end of the cooking time, you can remove the stuffing and turkey to rest, then put the potatoes under the broiler for a few minutes to crisp them up a bit. Turn them one for more even browning. (pro tip: keep a close eye on these potatoes, as all the fats and oils they have absorbed means they will crisp quickly and burn without supervision).

You can sub the russet potatoes for sweet potatoes; a mix of russets and sweet potatoes; make it a root veggie mix with carrots, turnips, potatoes, etc. Whatever you like.

One pan cooking makes it easier on you and less coordination. Results are the best in the 25+ years I have been cooking turkeys.

ONLY DOWNSIDE: If you make your gravy from pan drippings, with this method your drippings will mostly or entirely be absorbed by the starches beneath. BUT, my momma makes a fabulous gravy from pan browning the neck and giblets, and then making a base broth from them. It is essentially this recipe, but browning the neck and giblets first to get that caramelized, maillard-reaction flavor in the gravy that you would miss from the drippings. It whips up pretty darn quick, and is something you can do while the turkey is finishing cooking. Don't want the additional steps? Try a delicious make-ahead gravy to really impress.

Next year, I may try Alton's Turketta!

Double Chicken Stock / Poultry Stock

by Wednesday, December 09, 2015
You could do this with just chicken and call it "chicken stock", but I had a large turkey this year for Thanksgiving, which means lots of awesome turkey bones and bits and bobs, but I also have a freezer bag full of chicken parts from the past couple months which I wanted to make use of. So it's a mix of turkey and chicken parts for the first stage.

I think the magic in getting my lovely gelatinous results this time had to do with the meat-to-water ratio. I think I just was adding too much water in the past. I have since heard the suggestion in multiple places to make sure you have a quart of water per pound of poultry. So for a typical 10 quart stock pot, keep that in mind, and load it up well with the poultry and then add water around it only as much as necessary. As it boils off, you can add hot water from an electric kettle to keep everything under water without diluting it too much further. The meat and veggies themselves release moisture as they release flavor, and we are keeping this at a very very bare simmer rather than a boil, so we're not losing a ton of volume of liquids throughout the process to evaporation in my experience.

Some people do this in a crock pot with a cover on it, which is an option as well. It keeps a nice consistent temp, and with the lid it limits evaporation. 10 hours on low if that's your speed... Now on to my recent success!


Ingredients
Turkey carcass, cooked and stripped of most of the meat
Leftover cooked turkey parts (I put in wings meat and skin and all)
Uncooked turkey and chicken backs and necks (frozen and kept until being used)
1 or 2 carrots as you like, cut into big chunks
3 stalks celery, cut into big chunks
1 yellow onion, cut into big chunks (sensing a theme?) AND/OR
1 large leek, green parts and all (see note in step 2)
3-4 garlic cloves (chop roughly, or just smash--you can throw the skins in, too if you want)
A pinch of whole peppercorns
Fresh herbs of choice (I had thyme and marjoram from my garden)

  1. Throw poultry parts in to a big stock pot and cover with water. Set over high heat to start to boil.
  2. Meanwhile, chop all veggies, throwing them in as you finish.  For leek, slice down center and pry apart to rinse well, then (you guessed it) cut into big chunks. Toss in herbs. Add more water to cover if needed.
  3. When water begins to boil, turn down to medium-low or low, so you have the barest simmer. You don't want to agitate the ingredients any more than necessary. Just a teensy bit of bubbling on the surface is needed.
  4. You can skim the scum if you like throughout the cooking process, but I never do and even The Food Lab at Serious Eats has done testing to prove it doesn't really do anything to make your stock any clearer or purer. So it's up to you. 
  5. Simmer for 6-8 hours uncovered. I start mine before lunch and sometime after dinner I do the rest of the steps. I have done it as long as 12-18 hours, with good flavorful results. You can go 24 if you want, it's not unheard of. The longer you go the more you will be sure to have extracted all the gelatin from the bones, and the flavor isn't going to escape out the back door, so don't hesitate to go as long as you like/need. 
  6. Take two fine mesh strainers, put a layer of paper towel or cheesecloth between and nest them one inside the other. With gloves to protect your hands from hot splashing, carefully pour through strainer into another large pot. Your stock will be beautifully free of random bits, creamy yellow.
  7. Here is where Alton or any professional would tell you that you must rapidly cool the broth. Never put a hot pot of anything directly into the fridge as it will warm up your fridge to potentially dangerous levels. Some people nestle their strained stock bowl/pot into a sink full of ice. Alton also takes partially filled, frozen bottles of water and drop them into the hot stock and put them in a cooler full of ice. Be grossed out if you must, but I let mine cool on the counter for a while and then put it in the fridge. It was good enough for my grandma, it's good enough for me. So far I haven't died. *fingers crossed*
  8. Move to fridge then let cool overnight. Using a spatula or thin-edged ladle or spoon, skim the fat off the surface. You can reserve this for other cooking purposes (freeze in ice cube trays, then melt over rice dishes, pastas, etc for a punch of creamy fatty chickeny goodness)
At this point I had a delightfully gelatinous concoction. Over at the James Beard Foundation, they had a simple recipe to just poach a chicken/hen in this and then restrain, skim, cool, and store. I opted to do that, but also all the other steps all over again. So what I did was:

Double Stock Recipe
  1. Put cooled and skimmed stock back into stock pot on stove over high heat 
  2. Put a steamer basket in this and place whole 4lb chicken on it
  3. Pour in water to cover
  4. Chop all veggies as above, nestle with herbs around chicken and add any more water needed to be sure all is under water
  5. Bring to a boil, then again turn down to a bare simmer. Skim if you like as you go along
  6. 1.5-2 hours or until chicken is cooked through, lift steamer basket with chicken in it from the stock and set aside. Serve poached and hot now, or let cool until you can touch it then pull meat from bones and store for use in a future recipe.
    6b. Yes you can potentially throw these bones into a future stock. Since you cooked them for a shorter time (~2 hours), there is possibly some collagen still left to extract. Try snapping a bone. If it snaps easily it has given up all it can so just discard them. If it is still hard or bends easily, then there is more life in them bones! Freeze and save for another stock making day.
  7. Strain stock as above, cool before putting in fridge as above, skim fat, etc... and voila! A double stock to call your own!
Edited to add: if you wanna get really fancy, you can make chicken consomme, which is even MORE reduced, purified, and perfected. Here is a link directly to the James Beard recipe for taking your double stock to the next level.

2012 Leftover Turkey Pot Pie

by Sunday, December 02, 2012
Last year's impromptu Leftover Turkey Pot Pie was such a success, I looked forward to trying a different version of it this year. Chris wanted peas and potatoes, I compromised and did add frozen peas and used cream of potato soup. That's the other change--last year I didn't have fresh mushrooms, but this year I bought some baby portobellos especially for the recipe experiment, so the cream of potato took the place of the cream of mushroom I used last year. I also added some cheddar, which pretty much makes Chris' day any day of the week. This took a few more steps than last year, so not as "easy" as last year, but it was still really easy. Here ya go!

Ingredients
4 Tbsp butter
1 sweet onion, diced
1 large carrot cut into 1/4" half rounds
2 stalks celery, cut into 1/4" slices
4 oz baby portobello mushrooms (or mushrooms of choice)
8 oz frozen peas
1 can cream of potato soup + 1/2 can water
2 Tbsp flour
salt and pepper to taste 
2 cups leftover turkey, shredded
1 cup cheddar, shredded
1 package of Pillsbury pie crust
1 egg for brushing top of crust


Directions
Pre-heat oven to 450 degrees
Melt butter in a sautee pan over medium heat.
Cook onion for about 5 minutes.
Throw in celery, carrots, and mushrooms and cook for 5 more minutes.
Add peas, cream of potato soup, water and flour.  Season with sale and pepper.
(I didn't add any herbs, but if you wish to add any now would be the time.)
Simmer for 8-10 minutes to thicken, stirring occasionally to blend everything well.
Remove from heat, add turkey and blend in.
Line pie pan with first half of crust.
Fill with turkey/veggie mix.
Top with cheddar, then top with second half of crust pinching edges closed.
Poke some holes in the top, brush with egg.
Cover edges with foil, bake for 20 minutes. The remove foil and back for 15-20 more minutes until bubbly and browned. Let rest for 5 minutes. Cut and serve.


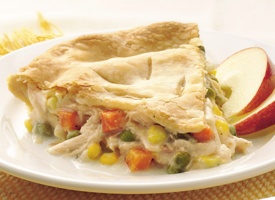
Leftover Turkey Pot Pie

by Monday, December 05, 2011
I have never liked pot pie. In general, I am not a fan of Irish-type fare where everything cooks together in a big slurry of mono-flavor. Like I wasn't a big stew fan either, and essentially putting it into a crust did not endear it to me. But in my ongoing theme of learning to love things I never used to even like by making it fresh myself (risotto, sausage-based dishes, and indeed crock pot stew) here we are with a pot pie recipe I really liked!

We ended up not having any guests at our annual traditional Thanksgiving Part Deux, so the traditional 18 lb turkey made for a lot of leftovers for us. We have had turkey omelets and scrambles (Chris would live on eggs if I or his cholesterol count let him), turkey sandwiches, the usual. But I wanted some dinner fare that was yummy and pleasegodnoteggbased (so no quiche thanks).

Pretty quick to prep, and yummy.  Most "easy pot pie" recipes called for thawed frozen veggie packs, but we don't tend to keep frozen veggies around much, and prefer fresh anyway. But you could save some prep time by using the prepped veggies instead of chopping fresh.  Still others called for pre-made gravy instead of cream of mushroom soup, but I wanted some mushroominess and we were out of mushrooms.  Lastly, I wanted to have some potatoes in this, but opted to leave them out as it was looking pretty stacked already, but you could cube up  a medium potato like the carrots and celery and throw it in that step.

The result? YUMMY! Chris went back for seconds and thirds and was like to burst. Being a big fan of pot pies, his opinion mattered more than mine, and he was oohing and aahing about it; so, success!  Here is the recipe:

1 box Pillsbury pie crust
2 Tbsp butter
1/2 large white onion chopped
3 garlic cloves minced
A handful of flour
1 can of low sodium cream of mushroom soup
1/2 cup water
1/4 cup milk
2ish cups leftover turkey
2 large carrots cubed medium
1 large celery stalk chopped medium
1 cup canned corn
1 tsp each rosemary, thyme*
1/2 tsp cumin
Salt & pepper
(*any savory herbs are great, use to taste. I would have used sage, too, but we were out)

Melt butter in large sautee pan, cook onion and garlic about 4 minutes. Toss in herbs and flour, stir to coat.

Pour in cream of mushroom soup, water, milk, & veggies, blend well and bring to a boil. Keep at low simmering boil stirring fairly frequently 8-10 minutes until veggies soften a little.  5 minutes through, throw in the turkey and salt and pepper to taste.

Heat oven to 425. Roll bottom pie crust into a 9" pie pan. Pour in the turkey mixture (it piles up a little but it fit!), roll top crust over, pinching edge closed.  Poke  a few fork holes along the top. 

Cover edges with foil for 25 minutes, then cook about 15-20 minutes until well browned and bubbly.  Let sit 5 minutes before cutting in.

PLEASE VISIT MY DANCE BLOG!


On this blog I share my personal posts about cooking and knitting, travel and other musings; while I will blog about dance-specific topics over on the Deep Roots Dance blog:
http://www.deeprootsdance.com

I hope you will enjoy both my sites. Thanks for visiting!
Powered by Blogger.