Featured

AMAZING Sparkle Rainbow Unicorn Poop Cookies

by Saturday, April 22, 2023

A friend in my ASL Club requested I make "rainbow cookies" for our next meetup. No idea what their motivation was, but I took it as a prompt to try something new. When I asked baking friends for suggestions, a common suggestion was "just look up Unicorn Poop Cookies", so I did.  WOAH! Those are cool! Colorful sworls of cookie dough, sometimes accompanied by a chocolate kiss on top? Perfect. However...

Many of the recipes called for sugar cookie recipes I thought sounded pretty bland. I am already not a huge fan of sugar cookies in general, but have been working on my own personal recipe this past year to hone in on the flavor. For my version, not only would I want to tweak the flavor dials, but the texture would need to be different. My goal up until now was the perfectly flat, no spread, firm sugar cookie for decorating. This was going to need different body to get the effect I wanted, but without compromising on flavor and texture. Enter some baking powder, which I omit from my favorite holiday sugar cookie recipe to avoid spread and doming, but here will provide some rounded loft we need for poop shapes. I took out the almond extract and replaced it with more (now double) the vanilla extract. I also added some lemon zest to this recipe, to add a touch of brightness I felt was needed for a cookie like this. Oh, and it of course could not be pastel for my cookies. I needed RAINBOW, as pastels will not do for the ol' ROYGBIV.

Enter Ann Clark gel colors. I had them in a wishlist from Christmas cookie baking, having never pulled the trigger. So I popped it into my Amazon cart and it was at my house the next day. WHERE HAVE YOU BEEN ALL MY LIFE?! Rich, vibrant colors with NO taste or texture effects. Just a couple dollops and WHAMMO. Bright, saturated colors for my enjoyment!!

12 colors, each of them as gorgeous as the next!

Mmmm, Ocean Teal comes in like a roaring peacock!

Super red is ACCURATE.


You'll be making your dough, dividing it into balls of however many colors you want to use, and then play with them like play-dough! I weighed my dough, divided by six, weighed out the balls to make sure they were even, and put them in their own bowls.

I put two droplets of gel into an indentation in the ball, and then used a small spatula to get the mixing started. I basically want to use a non-absorbant tool to get the color mixed in enough that I am not losing a bunch of the gel dyes onto my hands. Basically, you want as little of the gel looking wet on the surface of the dough ball, and some streaks of color should be formed in the dough before you pick it up.

Picked up the blob of dough, folding the outer edges to the middle and pressing, over and over. Fold and press, fold and press until the color is uniform. If you need more gel to get the depth of color you want, add it now. I didn't need more. MAGIC, I tell you. Ann Clark, you rock.

I rolled each dough ball into fat little burritos, wrapped each in parchment paper (can do saran, or whatever), and chilled for 30 minutes.

I took each burrito and cut it into thirds, placing two of the thirds back in the fridge to stay firm while I worked with one third at a time. The dough will soften with the warmth of your hands and become pliable. If it ever feels like it is getting too warm and floppy, you can put it back in the fridge to chill a little bit before working again. It won't do your cookies any harm. Just helps to have it firm enough to work with comfortably.

Further steps below:

Roll each chunk of dough into a long snake/rope. Mine were a little thicker than pencils. They don't have to be perfect, as you can see, and the thickness isn't so important as consistency of thickness between them. So they can all be thicker or thinner, but they should be the same as much as possible. to get even distribution of color.


Gently roll and press the dough ropes together to create a multi-color tube.
Using a knife or bench scraper, cut this in half.

Then cut each of those halves into thirds, so you have six little multi-color rope bundles. Each of these will become a poop swirl!

Gently start to roll one little bundle into a long snake/rope again. For mine I'd say I was working toward a 5 inch rope or so. Using even pressure as much as you can will keep all the colors visible, but don't fret too much. They are gonna look great no matter what.


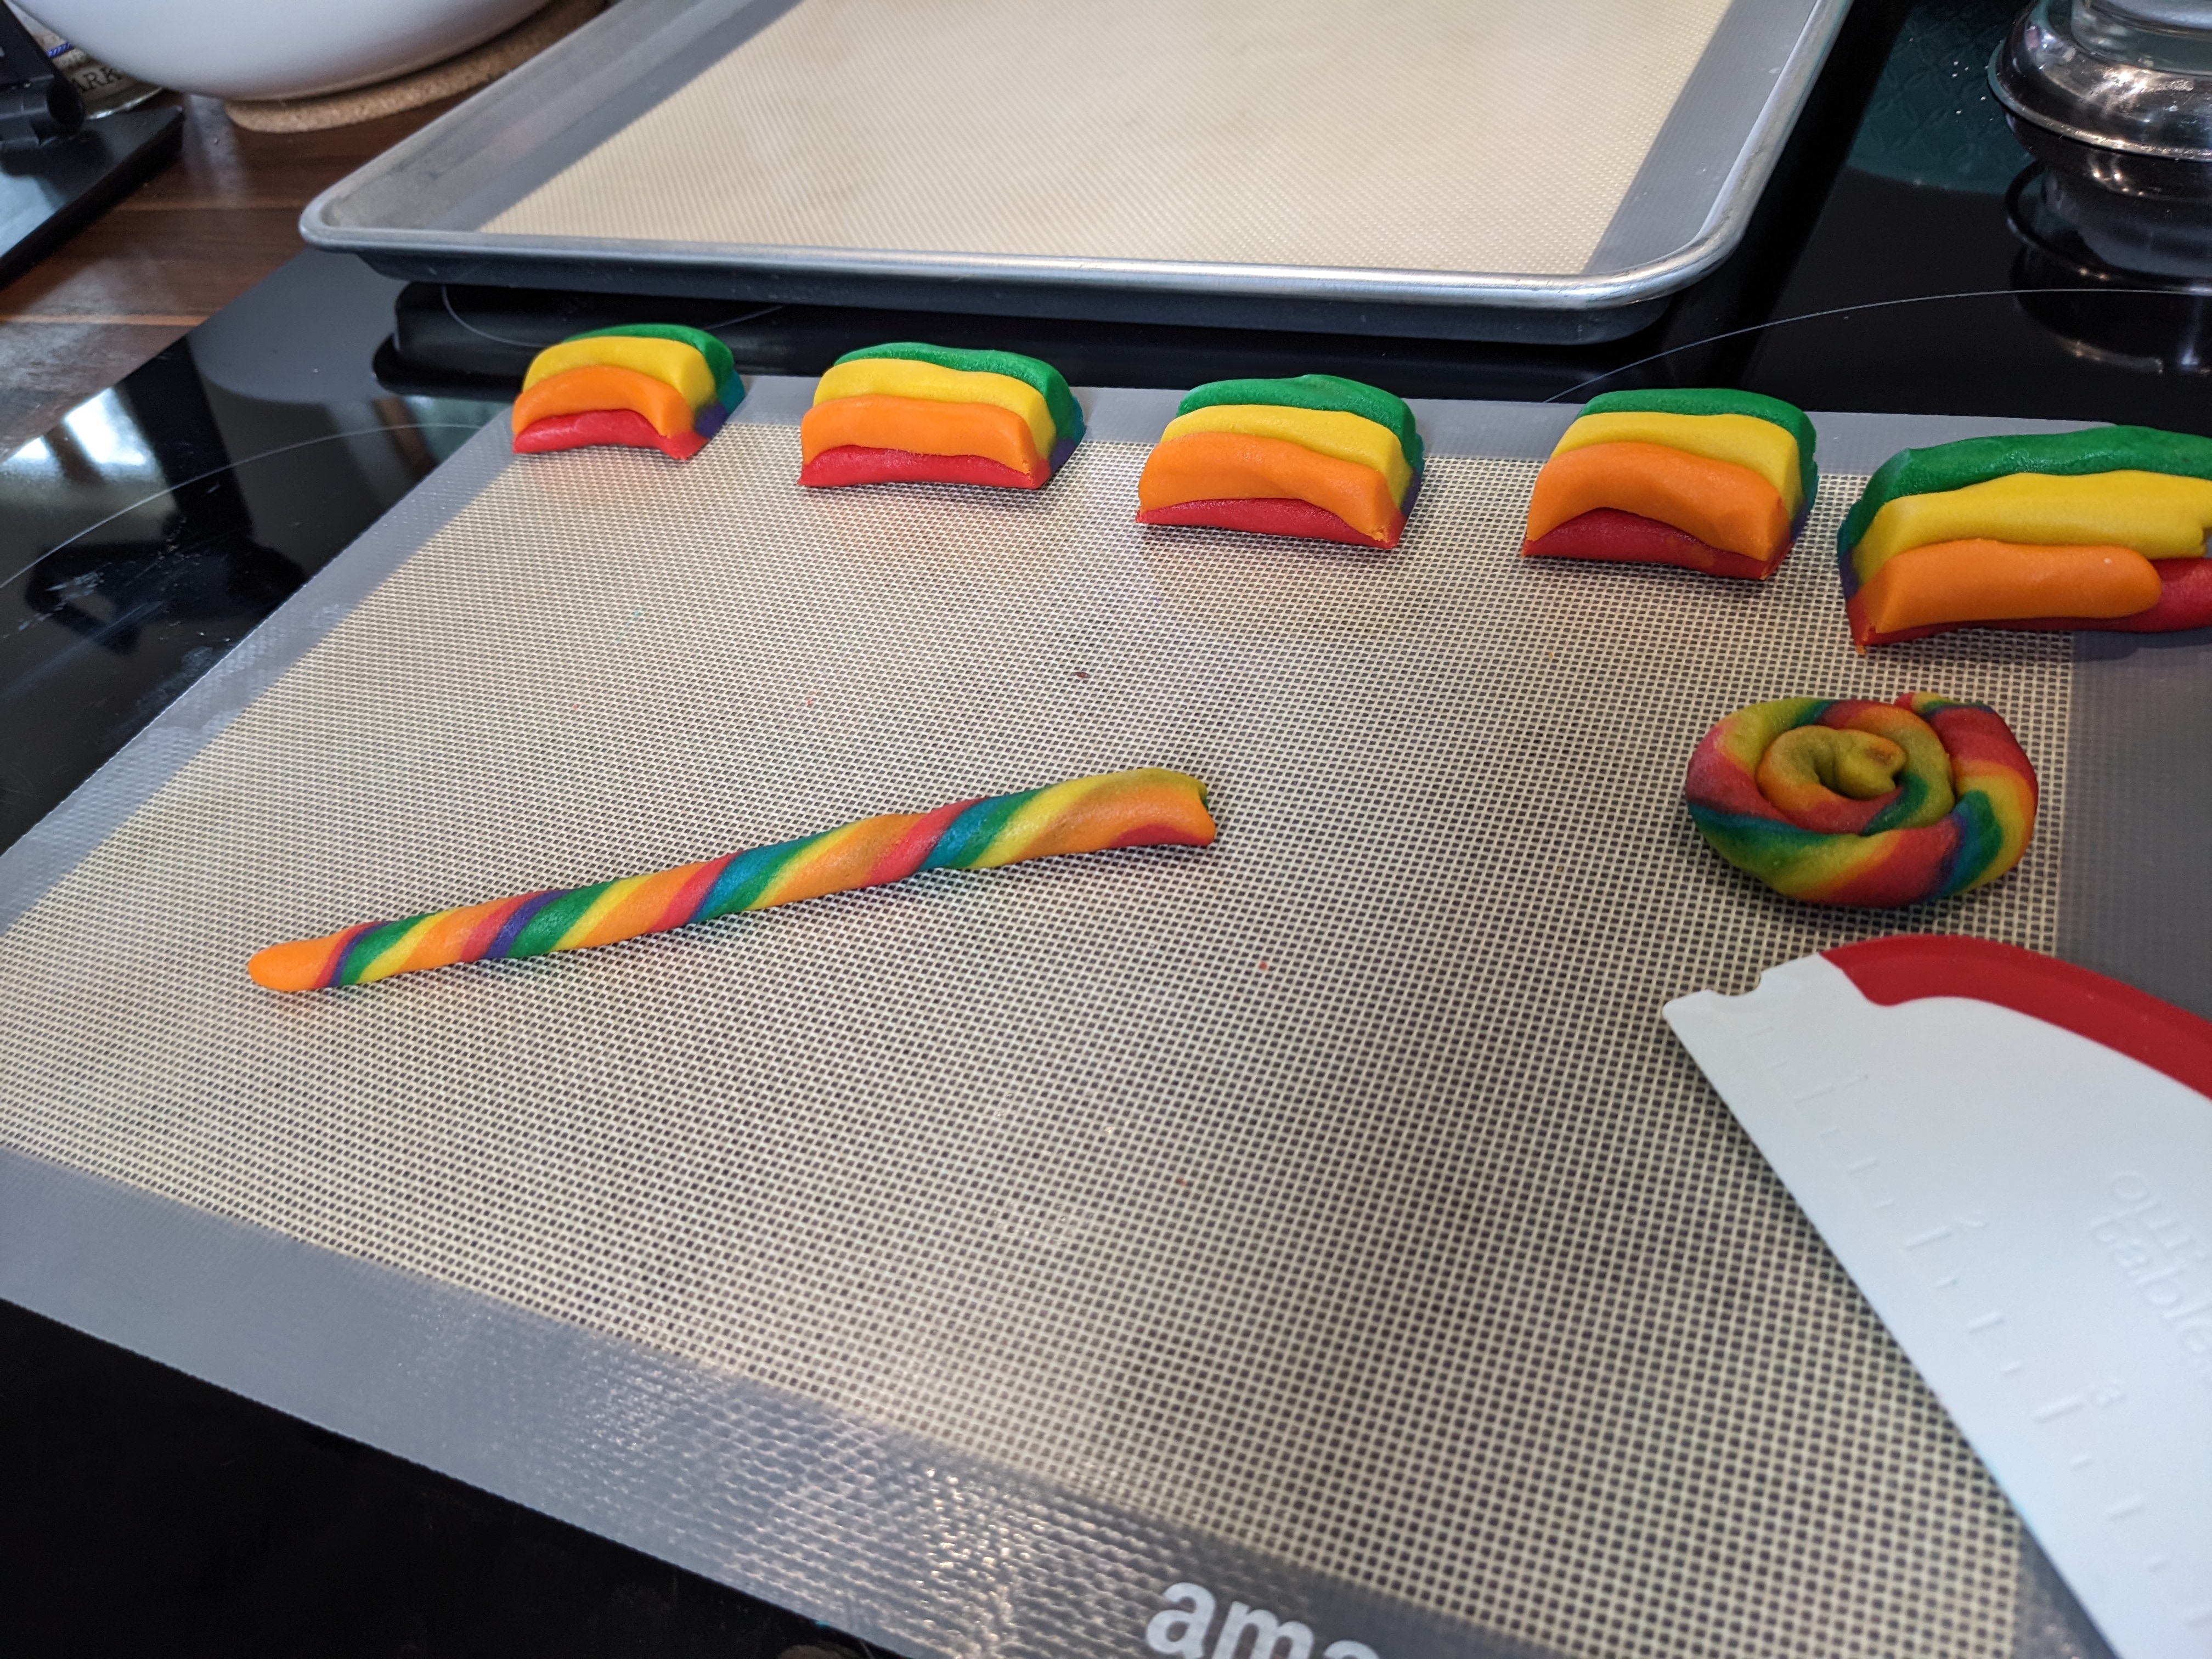
Now with gentle pressure, roll away from you on one side of the rope, and toward you with the other, creating the twisty color blend you see here. You will figure out now to manipulate it to get the result you want with a couple tries. Just don't use a ton of pressure, as we aren't trying to make the rope longer or thinner per se, just get the spiral effect.

Then take each rope and spiral it around itself. I chose to let mine be a flat spiral, winding from the inner coil to the outer coil. But some people pile it up more like what a poop emoji looks like, in which case roll it from the outer coil, upward and inward to the peak. For me, I was going to be pressing a chocolate kiss into the tops, so it wouldn't have kept that shape very well. If you are skipping the chocolate, you can try a piled-poo for more dimension.

Repeat with all the dough segments until you have your full complement of cookies. Keep the unused dough in the fridge until you are ready to work with it. As I filled a baking sheet, I would put it in the fridge to chill while I worked up the next batch, rotated that into the fridge while doing the next, and so on.

ESPECIALLY if you plan to pile up your swirl, refrigeration is VERY important. It will help prevent your dough from spreading and flattening as much. I refrigerated mine for 15-20 minutes (as long as it took to make each of the next batch into ropes) to firm it up enough to dip in rainbow sugar sprinkles. I used a little water spritzer to wet the top of each cookie, dipped the tops into a ramekin filled with the sprinkles, and then put back on the baking sheet.


Baked in a 350 degree oven for 8 minutes (as much as 10 if you sworl them up, since they will be slightly thicker cookies). If this is your last step, transfer to a cooling rack and let rest for about 10 minutes to set and cool.

I pressed a chocolate kiss into the top of each while still on the baking sheet, then used a spatula to transfer them to a cooling rack. Depending on how warm your house is, you can let them cool on the counter, or put them in the fridge to cool. The kisses can sweat and melt if the cookies aren't cooling off fast enough, so a 5-10 minute break in the fridge can combat that.

And there you have it. Sparkly, rainbow, crispy-but-soft, chocolate-kissed Unicorn Poop cookies! These positively flew off the plate, and onto friends' socials and then their faces. While I knew they would get kudos for how they looked (COME ON LOOK AT THEM!!!), I was so happy to learn that everyone was gushing just as much about the taste. My recipe was a flavorful hit, and you will find that below. Enjoy!


SHAY'S SPARKLE RAINBOW UNICORN POOP COOKIES
Makes 36 Poops

INGREDIENTS
Ann Clark gel food coloring in the colors you wish to use
1 cup butter, room temp, cubed (I used one stick salted, one unsalted)
1 cup sugar (I used white granulated sugar)
1 egg
1 Tbsp vanilla extract
zest of half a lemon (or more to taste)
2 tsp baking powder
1 pinch salt
3 cups all-purpose flour
decorative sugar or nonpareils/sprinkles (optional)
a bag of chocolate kiss candies (optional)

DIRECTIONS

  1. In a stand mixer, cream together butter and sugar until light and lovely, 2-3 minutes.
  2. Toss in egg, vanilla extract, and lemon zest and mix for another 2-3 minutes until well blended.
  3. Mix baking powder and salt into flour, and sift about one cup at a time into the cookie mix, scraping down the bowl between additions to make sure everything gets incorporated. Try not to overmix, just get everything uniform.
  4. Decide how many colors you want to use. Weigh dough and divide by number of colors, then portion and weigh out dough evenly into separate small bowls.
  5. Make an indentation in the dough ball, squeeze a couple droplets of your gel color into it and close over the top. Using a silicone spatula or other non-absorbant mixing tool, gently press and fold the dough to get the gel dye started mixing into the dough. 
  6. Form each colorful dough ball into a little burrito/fat tube, wrap in cling wrap or parchment, and chill in the fridge for 20-30 minutes.
  7. Take out dough, using a knife or bench scraper, cut into thirds. Keep 1/3 of each color out to work with, wrap up and put the rest back in the fridge to stay cool until you use them.
  8. Roll each individual colored dough piece into a long rope. As each is finished, line them up in whatever order you want them to be in, lengthwise.
  9. Roll all colors gently up into a multi-colored tube, pressing together lightly.
  10. Cut this tube in half, then each half into thirds, making six colorful bundles.
  11. Roll each bundle into a 5" rope. Then roll the ends in opposite directions to make the colors spiral.
  12. Roll the rope around itself in a spiral--either outward-in, stacking up like a coiled snake; or inward out, flat around like an old fashioned lollipop. Press the end gently onto the outer edge to make the cookie more round.
  13. Chill cookie spirals in the fridge while you pre-heat your oven to 350 degrees.
  14. If adding sprinkles or sugar, lightly wet tops of refrigerated dough with water using a brush or spritzer bottle (a friend suggested brushing with egg white, which I really want to try sometime to see if it gives them a sheen!), then dip top down into a ramekin with your topping of choice. 
  15. Bake cookies for about 8 minutes for flat cookies, 10 minutes for piled cookies (your oven may vary). Remove from oven, and if adding chocolate kisses to the tops, press them into the centers now while on the baking sheet. Then immediately transfer to a cooling rack. Accelerate cooling if needed in the fridge.
  16. Marvel at the sparkle rainbow magic you just made!

Jalapeno Popper Chicken Rollup

by Monday, April 03, 2023

2 large chicken breasts, sliced horizontally into two long/wide pieces (making 4 pieces)
4 oz cream cheese, room temp
3 oz cheddar (or Mexican cheese blend, or your choice)
2 Tbsp chopped green onions (1 full onion whites and greens)
1 large jalapeno, chopped finely (or two smaller)
4 oz spinach, gently wilted and chopped finely
2 tsp minced garlic (gently sauteed in a little olive oil to reduce bite)
1 tsp zest of lime (optional)
1/2 cup breadcrumbs (Italian whole wheat or whatever you have)
1 lime, juiced
1 Tbsp olive oil (plus some for cooking)
salt and pepper
toothpicks

  1. Preheat oven to 450. Lightly oil (spray or brush), or line with parchment paper, and set aside.
  2. Put chicken halves between two pieces of cling wrap, pound to even thickness
  3. In a bowl, combine all ingredients up to and including lime zest.
  4. Season chicken with salt and pepper, spread 1/4 of the mixture on each, with about an inch left uncovered at each end. Roll up firmly and seal with two toothpicks each.
  5. Prepare a bowl of breadcrumbs, and a second bowl of lemon juice and olive oil, seasoned with a little salt.
  6. Dip chicken in olive/lime/salt mixture, then breadcrumbs, then place on prepared baking sheet.
  7. Bake 25 minutes, serve immediately.
Serve over cilantro lime rice (or on the side of Fiesta Rice). Drizzle with avocado crema (below), garnish with cilantro leaves.

1 medium avocado 
1/2 cup sour cream or Greek yogurt
2 tablespoons mayonnaise
1 tablespoon lime juice
1/2 teaspoon salt
1/4 teaspoon ground cumin
1/4 teaspoon garlic powder
1 Tbsp cilantro, minced (optional)


Sourdough Chocolate Chip Cookies

by Friday, March 10, 2023

 Sourdough Chocolate Chip Cookies

https://www.theboywhobakes.co.uk/recipes/2020/5/7/sourdough-chocolate-chip-cookie
Makes 25 cookies

225g unsalted butter, diced
220g caster sugar
220g light brown sugar
3 large egg yolks

380g plain flour
1 tsp baking powder
1 tsp baking soda
1 tsp flaked sea salt

240g sourdough starter discard (100% hydration)
1 tsp vanilla extract
500g dark chocolate, roughly chopped

DIRECTIONS

Brown butter to remove water. Let cool a bit.
In bowl of mixer, add browned butter and sugars and whisk until smoothed out any sugar clumps
Add egg yolks and whisk on medium 2-3 minutes
Add discard and vanilla, mix a few more minutes until smooth, like cake batter
Mix flour, baking powder, baking soda, and salt, then add to bowl. Whisk in a “pulsing” cadence until just blended/hydrated
Swap out paddle attachment and add chocolate chips
Remove from mixer, press cling wrap down on surface and refrigerate 3-4 hours (minimum, up to 24 hours) before baking

Heat oven to 350f
Line cooking sheets with parchment
Roll balls of dough and set out 6 to a pan
Bake 16-18 minutes
If puffy in the middle, rap tray on counter to flatten them a little
Allow to cool on tray 10 minutes then transfer to wire rack to cool

This makes 25 cookies. If you want to make less, cut in half, using only one egg yolk.
Dough can be frozen for up to a month. Roll into balls, freeze on a tray, then transfer to a bag.

Zuppa Toscana

by Thursday, February 09, 2023

I had never had this soup before in my life. I stumbled on it when I was doing one of my usual recipe searches where I type in a few ingredients I want to use and see what it spits back at me. In this case it was spinach and Italian sausage. I thought I would get only pasta dish suggestions, but I got this instead, and am so happy I did. I have made it three times in as many months now, enough to eat some now and more to freeze for later. It reheats surprisingly well for something with potatoes and cream in it. With a side of crusty bread and butter? YUM


INGREDIENTS
  • 4-5 slices bacon
  • 1 pound mild or spicy Italian sausage, casings removed (I love Isernio’s Hot Italian)
  • 1 small yellow or sweet onion, diced
  • 3-4 garlic cloves, minced
  • 4 cups ounces low-sodium chicken stock
  • 3 medium russet potatoes, peeled and 1/4 inch dice
  • 3 cups baby spinach (or kale, as you prefer)
  • 3/4 cup heavy cream

DIRECTIONS

  1. Cook bacon to desired doneness, slice into bite size pieces.
  2. Cook sausage and onion in bacon grease until onion is translucent and sausage is no longer pink. Pour off any excessive fats.
  3. Add garlic and cook until fragrant (1 min or so).
  4. Add the chicken stock and potatoes, simmer for 12-15 minutes until potatoes are tender.
  5. Add spinach and stir in, allowing to wilt down.
  6. Add cream, bacon (save some back to garnish if you wish), stir together, season with salt and pepper to taste, serve with crusty bread.


Creamy Sage, Chestnut, and Squash Soup

by Monday, January 09, 2023

I was in my late 40's when I learned to love chestnuts. That is, very recently, 2022. I'd never had them, okay?! My partner decided to throw some onto our CSA order one week and, while they take some work, they were a complete hit with both of us. He had also thrown some red kuri squash on an order, since we had never tried that either. 

The chestnuts got 'et that week, and the kuri squash was sitting there waiting for inspiration. I decided to get more chestnuts last week, throw in a butternut squash, and make some warm, creamy soup! Cross-referencing other recipes, this is what I ended up making (this would work with a wide variety of squash, this is just what we had):

1 lb chestnuts
1 small-medium red kuri squash
1 small-medium butternut squash
1 small shallot, fine dice
3 cloves garlic, minced
4-5 leaves of fresh sage, minced (2-3 tsp fresh, 1 tsp dried or to taste)
1 Tbsp butter
1 cup veg or chicken stock
3/4 cup cream
a splash of dry white wine
salt and pepper
Optional: goat cheese or creme fraiche for garnish

Score and roast chestnuts
Roast nuts on a rack-lined sheet pan in a 450 degree oven for 35 minutes or until tops are peeling back. Put chestnuts in a kitchen towel, squeeze to crack/release shells. When cool enough to handle, extract the meat and remove papery skin as well. Finely rough-chop nuts and set aside. Meanwhile...

Roast squash in 450 degree oven.
Cut butternut squash in half and scoop out seeds, oil lightly and place face down on a foil-lined baking sheet. Cut red kuri squash in quarters, scoop out seeds, and then cut one more time into eighths. Oil and place on the same sheet pan. Roast for 25-40 minutes until soft and mashable. The red kuri was done before the butternut squash, so I just removed them to a plate and let the butternut squash continue a bit longer. Scrape flesh into a bowl and mash up. You don't have to mash too much here, since you'll be blending the soup more later.

Cook shallots and garlic.
Melt butter in a pan over medium heat, cook shallots a few minutes, add garlic and cook until fragrant. Add sage and chestnuts, to bloom the sage a bit and warm and soften the chestnuts further, 1-2 minutes. Add more butter if it seems too dry. There's always room for more butter!

Put it all together.
Add squash, stock, shallot/garlic/herb/chestnuts mix to a pot and stir together. Splash some white wine, and add cream a bit at a time, saving some back if you're not sure of the consistency. Before soup is hot, use immersion blender or regular blender to blend together all ingredients until smoothed (mine still had small chunks of chestnut in it, that was fine with me!) Never blend piping hot soups, it is a splash/burn risk. Blend while warm, then heat to desired temperature once it is blended, adding more cream if needed to reach desired consistency. Mine was a bit thick, but you may want yours thinner. Add salt and pepper while heating, to taste. I like a lot of fresh ground pepper in mine, to counterpoint the sweetness of the squash and chestnuts.

Ladle soup into bowls, top with goat cheese or creme fraiche as desired.

This goes great with a rustic, crusty bread if you have it!

I was amazed at how naturally sweet this soup was. Some recipes call for a little sugar in them, and I can't imagine needing it, with the sweetness of the squash and nuts already being so strong.


PLEASE VISIT MY DANCE BLOG!


On this blog I share my personal posts about cooking and knitting, travel and other musings; while I will blog about dance-specific topics over on the Deep Roots Dance blog:
http://www.deeprootsdance.com

I hope you will enjoy both my sites. Thanks for visiting!
Powered by Blogger.