Super Fast Easy Quiche Crust

by Monday, May 27, 2019
I am terrible at baked goods in general, so it is unsurprising that I avoid crust recipes of any kind. I often keep a Pilsbury fridge crust on hand for when I want to make something with a crust. So I was very happy to find this recipe to be very quick to put together, and allowed me to make a quiche on the fly this morning. I am adding the changes I made to it to make it work for me.

INGREDIENTS
  • 1 cup flour
  • 1⁄2 teaspoon salt
  • 1⁄4 cup olive oil or 1/4 cup canola oil (or possibly 1/2-1/2 oil and butter)
  • 1⁄4 cup ice water (my fridge door water was cold enough)
DIRECTIONS

  1. Mix flour and salt with fork. Optionally add some herbs, like dried rosemary, oregano, and/or thyme to the dry ingredients. (Could I add sugar and vanilla for a sweet crust? I think so!)
  2. Beat oil and water with whisk or fork to emulsify
  3. Add oil/water into flour and mix with fork.
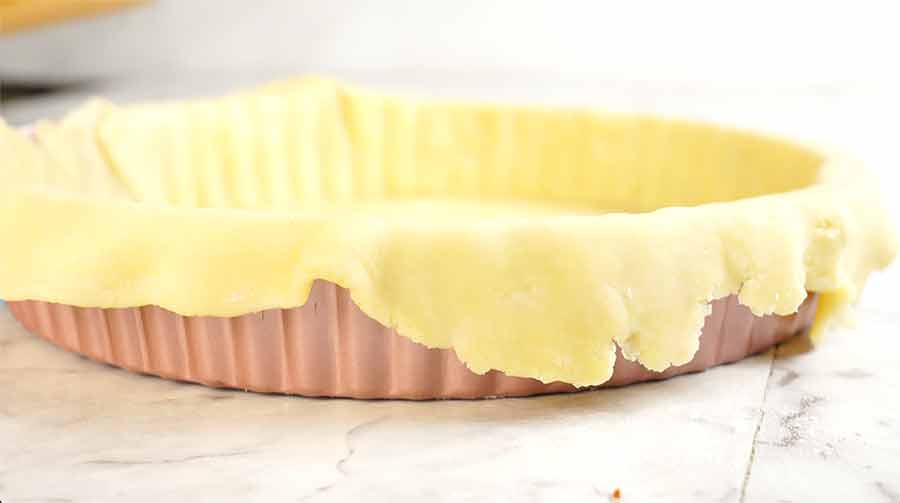
  4. Press into 9" pie crust, trying to keep the thickness even as possible.
  5. Pre-bake/blind bake for 5-7 minutes to crisp up
  6. Fill with quiche mixture of choice and bake at 400F until done.

While we're here, this is the quiche recipe I made:

INGREDIENTS
  • 5 large eggs
  • 3⁄4 cup milk or cream
  • 3⁄4 teaspoon salt
  • 1⁄4 teaspoon black pepper
  • 1 cup cooked ham cubes (store-bought cubes for pizza toppings)
  • 1 1⁄2 cups shredded cheese divided (I used 1 cup cheddar, 1/2 cup mozarella)
  • 3 tablespoons green onions (I used chives from my garden)
DIRECTIONS

  1. Preheat oven to 400 degrees F.
  2. Prepare pie crust in a 9" pie plate, crimping the top edges if desired.
  3. Blind-bake crust for 5 minutes if you would like to
  4. In a large bowl, whisk together eggs, milk, salt and pepper.
  5. Sprinkle ham, 1 cup of cheese, and green onions into the pie crust and pour the egg mixture over top. Sprinkle remaining 1/2 cup cheese on top of egg mixture.
  6. Bake for 35-40 minutes until the center is completely set. Let cool for 5-10 minutes before slicing and serving.

Teaching Board Games

by Friday, May 03, 2019
A typical game night at our house. Game pictured: Valeria Card Kingdoms
Some of my favorite blog posts come out of excellent questions and discussions on Board Game Geek on Facebook. Today was no exception as I sipped my tea this morning and read a thread on how people approach teaching board games to groups. A gentleman on the group is planning on teaching people how to teach games at their local library, which is brilliant! Here is my response:

My process before bringing a game to teach to a group:
  1. Read rules myself, punch cardboard and prep game storage as needed
  2. Watch video tutorials or playthroughs if I need supplemental learning
  3. Play game by myself or with a close friend or partner to get the flow and better understand the system
  4. Day-of, decide if showing them a tutorial or teaching it all myself is the best way to approach it.
  5. Before teaching/showing rules video, give them the "flavor spiel"--aka the story behind the game, our goals/win conditions, and/or anything to convey the feel and concept of the game in a fun way.
  6. Rules-portion of the evening, either me or video
  7. Answer questions, maybe demonstrate a practice round if it makes sense to do so.
  8. If particularly complicated, it may be helpful to play a few learning rounds with everyone taking a turn "open hand"--that is, with any hidden information, goals, cards, etc open to discuss the flow of the turn and the round.
  9. Set up and play the game.
  • Bonus tip: giving people something to do during set-up keeps them engaged and interested, and helps them get to know the components you will be teaching them about. For instance, take the simple game of Azul. I will give the player boards to one person and ask them to pass them around to everyone, colored-side-up, along with a black cube marker. I will have someone else distribute the market "coasters", removing however many we need to for our player count. I will have someone else in charge of the tile bag and setting out the initial tiles. This is an engaging, tactile way to include everyone instead of them sitting there watching you do everything. Gets them excited before they even begin.


PLEASE VISIT MY DANCE BLOG!


On this blog I share my personal posts about cooking and knitting, travel and other musings; while I will blog about dance-specific topics over on the Deep Roots Dance blog:
http://www.deeprootsdance.com

I hope you will enjoy both my sites. Thanks for visiting!
Powered by Blogger.